Jay Fisher - Fine Custom Knives
New to the website? Start Here
"Raptor"
--Jay Fisher
Jay,
I was tracking the package eagerly and was happy to find it arrived a day early. The knife is simply
beautiful. Without being prone to hyperbole- it is the best knife I have ever held by far. I am
so, so impressed. The balance is absolutely perfect. This is a beast of a knife, but it fits my
hand like it was made for it- feels like an extension of my arm. The geometry of the blade is so
perfectly symmetrical and the the cutting edge is surgical.
I remember reading your website where it says that you "make the real thing." I believed that
statement when I read it, but now I feel what you mean. This is no factory production knife.
I know our men in combat who carry your knives have confidence that the knife will stand up to
any challenge. The kydex sheath is awesome and it locks the blade without even a slight jiggle.
The accessories are such a nice touch and I greatly appreciated that you put that much thought
into the components that would compliment the knife/sheath.
Jay, this is the finest object I have ever purchased. Thank you for being the professional that you are.
Sincerely,
--C. B.

Hello Jay,
I sat down to open the package containing Arctica with a bit of trepidation, expecting a complex system that would require some work to appreciate. After first admiring your impeccable and beautiful work on the obviously made-for-business-use leather sheath, I laid out the rest of the box's contents. As I did, the first thought I had regarding the Arctica knife and tactical sheath was, "This is the real deal."
What a great looking handle, with the brass fibers providing a visual texture that made me want to pick up the knife. Taking the knife, in the sheath, in hand and appreciating the solidity of it as a unit is a striking tactile indicator of how tight the design and implementation is. This is a precision piece of engineering. I'm relieved that the handle isn't too large for my hand. Now to the really fun part, hitting that locking-mechanism release with the tip of my thumb and drawing the blade from the sheath. And then doing it again and again, just to enjoy it; it locks securely with no play of knife in sheath, but releases so easily with the natural draw grip. I wondered if you had an "Aha!" moment when you thought of the design.
This is a robust knife, with the feel that only the best tools have. To me that feeling is, "I trust this tool to get the job done. I can rely on it to perform whenever I need it, under hard use and bad conditions."
Setting the knife aside for a bit I go back to the sheath and its functionality. I find the HULA ingenious and it makes so much sense to have this attached to the sheath rather than a separate attachment point elsewhere. Moreover, the ball joint lets me put light wherever I want it, with the paddle-tensioner easily adjusted with a gloved hand. At this point I am certain this is going on the sternum harness.
Jay the integration of the fire starter and diamond sharpener are well done and together with the spare parts and accessories, to say nothing of the sternum harness, complete this "ultimate package." All of your detailed instructions are a valuable resource, but my initial trepidation about the system was unwarranted. What you've built is precise, robust and intuitive. You did the thinking so I can do the 'doing.' I think my words of appreciation for Aquila were more concise, but I've had such a good time this afternoon getting to know this Arctica that I wanted to share my delight.
Again, much respect for your knowledge, skill, precision and attitude. To be the pinnacle of human endeavor in a chosen field is indeed righteous.
Thank You,
--M.
“Better to have, and not need, than to need, and not have.”
--Franz Kafka
Writer, 1883-1924
If your sheath doesn't ride to the party, your knife can't dance.
What's all this about? Service, that's what. Personalized, individual, and suited to your needs and necessities pure custom service. It's about you and your ability to get your critical knife and essential accessories into your mission, on scene, into your gear, and into action. This page is about the accessories I make for my tactical combat and professional kydex sheaths for my professional grade tactical, combat, counterterrorism, working and critical needs knives. Here you will find descriptions, details, materials, construction, reasons, instructions, and care guidelines for these useful accessories.
I started offering these accessories decades ago after some of my military clients asked if I could widen the scope of wear options with devices particularly suited to, custom made for, and designed as well as my locking tactical combat knife sheaths. Though most of my sheaths can easily be worn on most belts, straps, or webbing on tactical gear, there was a need in some cases to lower or change the position or orientation, incorporate a variety of mounting options, add other items or devices, or have dedicated harnesses that could allow various wear decisions. As part of my commitment to service in this field, I design and make all of the accessories you see on this page.
Every person, every outfit, every mission is different, and this accessory page reflects that. Nearly all of these accessories are designed for the individual combat, tactical, or counterterrorism knife sheath, specifically my locking kydex, aluminum and stainless steel tactical knife sheath and my newer hybrid tension-locking sheath.
These are clearly the best tactical combat knife sheaths in the world.
I can make this claim because it's true. If you think you can find a better made, more durable, secure, and dedicated locking waterproof tactical combat knife sheath on this planet, please email me and I will revise my position. Until then, if you want to understand just what the best sheath on the planet looks like, visit my page dedicated to the locking sheath. After you're finished, come back to this page to see what accessories are available for these sheaths and knives.
I'm always working on something new, creating some device, component, or accessory to answer a variety of performance needs, and as I do, I'll post the new applications, descriptions, and photographs on this page.
Thanks for being here.
Every person, every outfit, and every mission is different.
This is a limited service. I can not make every wear accessory that a client can think of, and will only make the most necessary and requested items and accessories. I also reserve the right to choose only the materials and arrangements that I know are suitable to the task. Because some of these accessories by their very materials and construction are somewhat pliable and less wear-resistant than metals, they may more easily show signs of wear. I make no guarantees of these items other than I will make them the best way I know suited to the individual need.
Beyond these statements and disclaimers, please know that I have had nothing but positive feedback on these accessories, and I've never had to repair of replace a single one of them. In fact, I'm often asked to add more features, more accessories, and expand the kits for an even greater variety. The reason is that my clients realize that I build the custom kits to interface with all component parts, to match in durability, finish, and style, and that I'm the only one doing this for these knives, these clients, these professionals that request my work. I answer their needs, listen to their requests, and simply solve their problems. The well-made accessory can add a lot to the wearability, usefulness, and comfort of the knife wearer in the actual combat, rescue, and tactical field as well as everyday field use.
The first thing to remember is that a knife is not carried; it is worn.
A knife is not carried; it is worn.
Hello Jay,
I bought a Krag from you several weeks ago. It is wonderful. Built like a tank, a perfect example of KISS. It
maybe isn't quite as lovely to look at as some of your other work, but I would expect gravity to fail before
the Krag failed.
But this letter is not about the Krag. It's about the Hybrid Kydex sheath that came with it.
I don't know if my experience with what is normally considered 'a sheath', is out of the ordinary, but until I got your hybrid sheath I never, ever had any sheath that was sturdy enough, or dependable enough, out of the box, to serve in anything but casual wear.
I have modified or replaced or discarded almost all of the other sheaths I have used. The ones that made it to non-casual use usually had some duct tape or electricians' tape doing one-shot duty, or maybe a cotter pin added, or somesuch. 'Kludge' is a good description.
I am in awe of the design and the execution of your hybrid kydex holster. You have won the holster/sheath contest, hands down, and nobody else made it thru the qualification trials. They can all go home and cry in their beer, because I don't think anyone is ever going to top what you have done.
Holster orientations of up, down, left, right, horizontal or vertical, use with different thicknesses of belt or strap, can all be selected just as one wants, and every single one of them is rock-solid dependable, not a hint of flaky or gimmick. Easy as can be to change in the field, is sorta a cherry tossed on top of a perfect piece of gear. Oh, and don't forget that the service lifetime of this holster looks to be long enough to outlive the user.
Perfect. It's just bloody Perfect.
Thank you again.
Regards,
R.
I make tactical, working, rescue, combat, and counterterrorism knives. Since they are real tactical knives, not just "tactical" in appearance, they are actually made to be worn and used in the most serious of uses. Because of their real world application, it has been necessary over the years to include everything my clients request for them. This starts with the toughest, most durable, and best made knife sheath in the world today (and ever): either my positively locking sheath or my hybrid tension-locking sheath. My experience has been that since the sheaths have to be worn, and since everyone is different and every mission or application is different, it's important to include all of the necessary straps, clamps, hardware, mounts, and equipment to wear each knife and sheath with every tactical knife.
It is rare that a tactical knife is only worn in one place; as the owner's gear is refined and regularly upgraded, the sheath must be able to mount to an evolving combat framework. Typically, a client who wears these knives will have multiple applications and missions, and because of the limitations of his other gear, he'll have to move the knife and sheath to different locations to accommodate. For instance, the United States Marine in desert warfare currently has only about one place he can mount a tactical knife, and that is along his leg, below the waist, and above the knee. Of course, this may change depending on his particular gear, environment, or mission. I want my clients to have all their bases covered, and every option available.
From time to time, I receive requests for tactical knives that are "bare bones," that is just the knife and sheath, and no accessories. I rarely do this because of the reasons above, but taking it a step further, let's just examine what would happen if I did offer simple knife and sheath combinations, without all of the other hardware.
I've had the experience of doing this very thing; this is how I used to make and sell my tactical knives. When I did, the first thing that would happen would be the client contacting me and saying, "Gee, I really like the knife and sheath, but do you have a way to mount it lower on the belt?"
This is how and why I developed and include the BLX, UBLX, and EXBLX Belt Loop Extenders.
Then a client would ask, "Is there any way I can mount this horizontally along my belt line?"
From this, I developed the Horizontal Belt Loop Plates.
Then a client would ask, "Is there a way I can fix the sheath to my PALS on MOLLE, or vest webbing?"
I developed the Horizontal and Vertical Clamping Straps.
Another client would ask, "Can you make something to mount the knife over my sternum? It's the only place I can wear the knife. And by the way, it has to be handle-down."
I created the Sternum Harness and the Sternum Harness Plus.
A client submitted, "I do a lot of work where I might be in the field after dark, and sometimes, even in the daytime, I need a small light for examination or emergencies, or just finding my way."
I created the LIMA, with the Maglite® Solitaire, then the Solitaire LED, and then the ThruNite® Ti3 LIMA.
Then clients asked, "The little light is great, but can you actually give us a main (or key) flashlight. We need one that can be our main lamp, with super-bright illumination for nighttime operations. Oh, and we need it to be able to be aimed in a fixed position, in any direction from the sheath. Then, we need to be able to remove it, replace it, and depend on the holder to never rust, corrode, or bend."
I created the HULA with Maglite® XL100, then XL200, then MagTac®, and then Fenix® E35 and Fenix® RC11, and Streamlight® Sidewinders. My counterterrorism clients claim that "Two lights are only one light, and one light is no light." This is a logical, serious, and practical observation, since lamps can fail, batteries can die, and components in flashlights, no matter how tough, can stop working. A simple failure of a light can leave the owner crippled in the darkness, so most CT kits have both the LIMA and the HULA.
Some of the accessories were needs that I noticed, like the simple need for a touch-up sharpener, so the pocket on the UBLX was added with a DMT Dia-Fold® sharpener. Another was the fire starter for outdoorsmen, less often requested. I had knives with lanyard holes, but no lanyards; two types were added. Lately, I've added real diamond sharpening pads with essential pad-bags to carry, store, and use them. When I noticed that some of the drawstring bags the knife kits were stored in were literally worn out, I looked for a durable duffle that could accommodate the entire kit. There were no duffles of any strength or durability, so I saw the necessity to create my own, with 1000 denier polyester coated, water resistant Cordura® ballistic nylon and heavy straps and zippers.
Consequently, the kits grew, and continue to grow to this day. My logic is this: I simply want my client to have everything associated with his knife. It's part of my service commitment to my career field.
Let's just look at what happens if I don't include all these accessories in the kit. I can reveal this because it's happened before. The client buys just the knife and sheath. He then notices that the sheath is a fixed form, and has a definite and universal mounting hole arrangement for straps and hardware. Since no one else in the world makes this, he then contacts me because he wants a different mounting or wearing arrangement. It's just a few straps to create, and maybe I can match the color of the anodizing with the rest of his gear, but maybe not, since I anodize in batches. But in order to make his accessories, I would have to stop what I'm doing (while five years in backorders) to make the parts. More logically, he should take his place in the queue, and wait five years for his straps to mount his knife. What? And then later, he wants a UBLX, but it's custom made for the knife (they all are) and I have to have the knife shipped back to me, so I can get the sizing and arrangement correct for the custom fit, and maybe he has to wait five years for that...
You can see why this is impractical.
Another point is that sometimes, a potential client may think that if Jay just offers the simple knife and sheath combination, he'll get a big discount and get the knife for less money. And then, he can add those accessories as time goes on, to spread out his investment.
If a client is strapped to pay for the kit, he probably should not be buying the knife. Most other makers won't say this, but the last thing I want to do is to impose any financial burden on my clients. I know what it is to live and work within a budget, and I also know what a tremendous amount of work it takes to make these knives; they are quite literally the finest, most complete tactical knife kits in the world. If you don't think so, I challenge you to find any that compare, anywhere. The fact that they are so difficult to make is why you don't see them anywhere else. This means that the incredible amount of labor means a higher price. As I've stated before, I'm not interested in making budget knives; I've only got one life and one career, and I want to make the very best knives (and kits) I can possibly create in that time.
The materials detailed in the following sections are described in great detail. I strive to create the tactical knife sheath accessories with the same diligence and attention to durability, strength, usefulness, and reason as I do the knives, leather and tactical sheaths, stands, cases, and displays. I simply try to make the very best accessories possible.
Note that just like in knives, there is no ultimate and supreme material or arrangement, only the best choice for a given set of circumstances and value. Every person, every outfit, every mission is different. For instance, making a sheath out of solid titanium might be an attractive thought, but is far beyond the financial reason for a knife that will be used in the field. Conversely, a typical thin kydex (1/16") sheath put together with hollow eyelets that nearly every knifemaker and factory provides is very cheap, but it will not stand up to the realities of active, intense, and realistic combat, rescue, and emergency work.
The materials used and my experience with them are detailed below. I'll update these as new accessories or evolution of existing accessories dictate.
Just like my knives, only the very best, most durable materials are part of my tactical, combat, and rescue knife sheaths.
Where mechanical metal fasteners, components, and parts are required, I have several options.
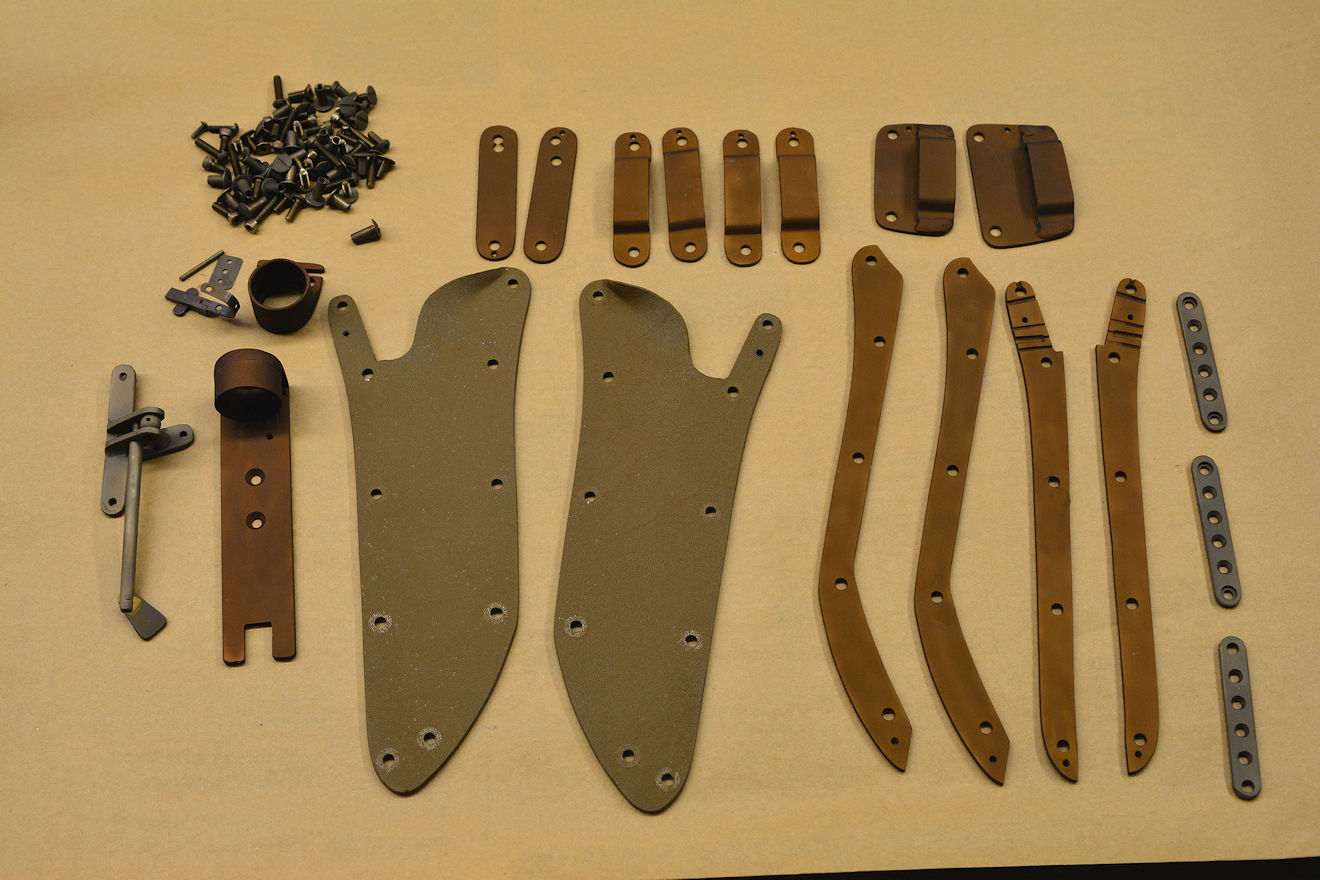
I build all of my tactical combat knife sheaths over a frame of aluminum. I do this because aluminum is stronger than kydex by many orders of magnitude, it's lightweight, tough enough for mounting fasteners and hardware, and the right choice of aluminum alloy is corrosion resistant. Other makers are not using aluminum frame or aluminum welt sheath construction and this is because they believe that it's just too much trouble.
Frankly, the sheath is just as important as the knife, and in true combat the sheath construction can literally mean life or death. I cannot overstress the importance of the sheath, and it is my dedication to the tradecraft and art and my commitment to my military, counterterrorism, law enforcement, and critical response professionals that require me to build the very best sheath possible, so that the very best knife with interface with their gear in a durable, reliable way, and arrive at the mission, incident, or theatre of combat as reliably as possible.
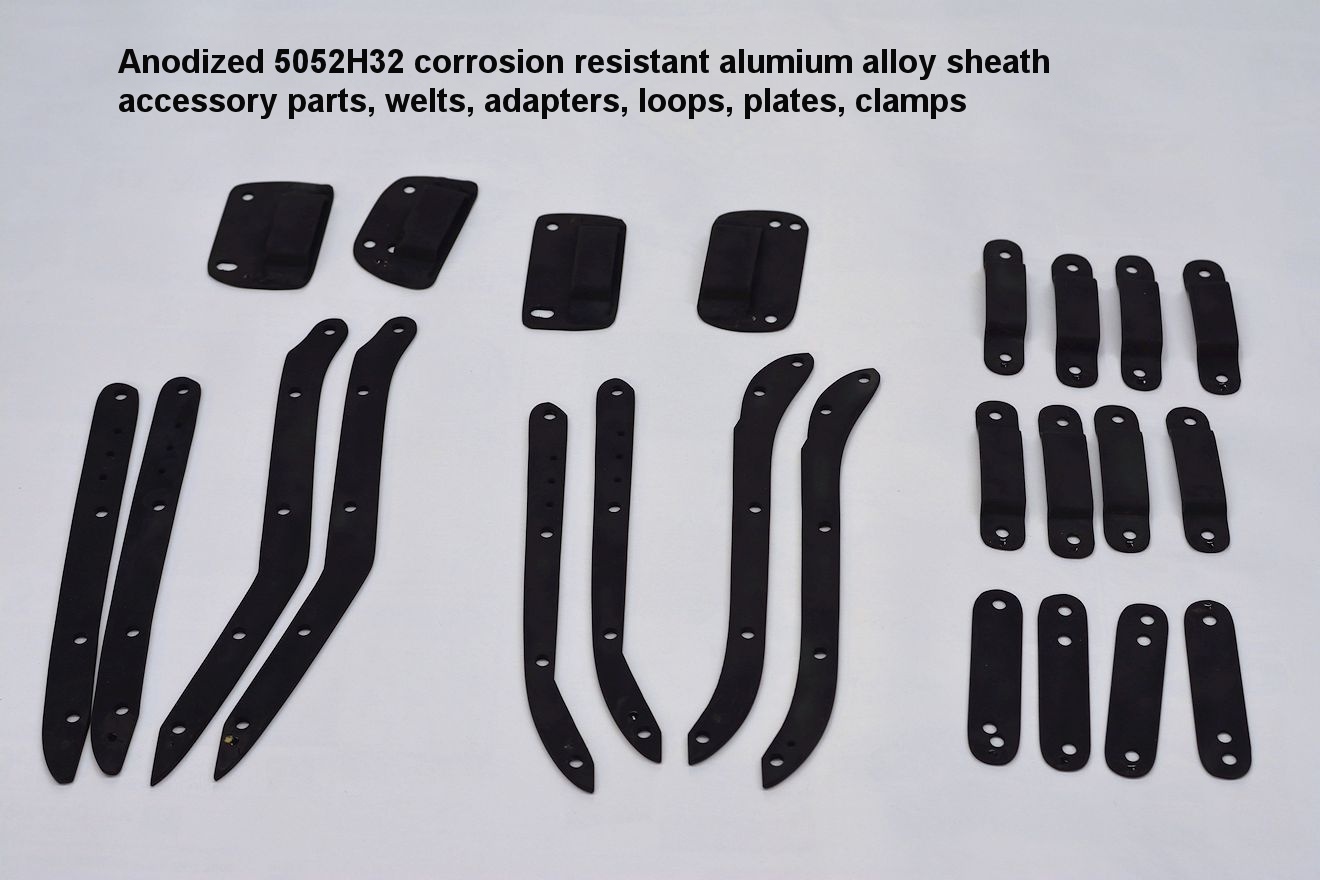
The aluminum I have chosen for this task is 5052H32. 5052 is the alloy, it is classified as a high strength, corrosion resistant aluminum alloy, and its main alloy components are magnesium and chromium. Yes, chromium! This is some very tough, very durable, and very corrosion resistant alloy. The H32 refers to the hardness, which is 32 on the Rockwell B scale, so the material is hard as well as tough and corrosion resistant. I've made many, many tactical combat and counterterrorism knife sheaths and accessories from this alloy, and not one of them has failed or worn out, in any way, ever!
I use this alloy for not only the sheath frame (welts), but also the belt loops, footman's loops, flat horizontal/vertical clamp straps, horizontal belt loop adapter plates, and the the HULA flashlight holders. All of these critical components are 5052H32, and the literal mounting hardware that holds the knife on the gear, rig, and body are made of this reliable material, here, in-house in my studio. Usually, the clients request the aluminum be flat finished or media-blasted to reduce glare and reflection.
To improve on the alloy and components, there are two characteristics that are important: appearance and surface hardness. The appearance can be aesthetic, but also many tactical applications require reduced flare, reflectivity and camouflage. It's important to understand that untreated aluminum can not be permanently colored. The untreated surface of the aluminum can also be easily abraded by harder materials, like a knife blade, sand, or other metals. Inside the sheaths I make, this is not a problem because the cutting edge contact area is coated with a softer epoxide coating that beds the blade and gives a place for the cutting edge to rest that is not metal and does not cause wear on the cutting edge of the knife blade. On the outside of the sheath, and particularly at the mounting hardware (belt loops, clamps, etc.) the surface contact area where fasteners make contact can be improved, overall, by anodization. Aluminum can also be colored by anodization dyes, if anodized.
What is anodization of aluminum? It's a process where the aluminum is made into an anode in a specialized electrified bath and chemically treated to impart a hard, durable, corrosion resistant surface that improves the surface characteristics of the metal. The surface treatment is not just in appearance; it is physically stronger, more scratch and abrasion resistant, more corrosion resistant, and even electrically resistive. This means that in certain exposures (like salt water) it's much more difficult for electrolytic corrosion to start. The surface is near ceramic-hard, and I typically anodize at 1 mil depth, twice the thickness of most aluminum surface anodization treatments. During the process of anodization, the open crystalline structure of the surface can be dyed, so many colors are available, or the aluminum can be left undyed. For combat, tactical, and counterterrorism knives, the desired players are black and coyote brown, and these can match the sheath and accessories. The dye is sealed in when the surface is sealed, and this creates a deep, permanent color of the aluminum-hardened surface that will not wear off. The sealing treatment I use even improves the dye resistance to fading in sunlight.
Anodizing adds some cost to the project, but when required, it produces a premium aluminum in sheath fixtures, fittings, and accessories unobtainable in other metals and materials. It improves appearance, surface texture, hardness, wear resistance, corrosion resistance, electrolysis resistance, and durability overall. It also matches the rest of the components of the sheath and kit.
I use all, but there are distinctive differences and limitations in them. Polypropylene is a thermoplastic polymer, and is extremely rugged and durable. It is highly resistant to many chemical solvents, bases, and acids, as well as water. Therefore polypropylene does not absorb water, soil, and contaminants as readily as nylon, and it does not sink in water and it will not mold. The same is true for polyester, which is more stable in ultraviolet light (intense sunlight).
Nylon is a thermoplastic synthetic polymer, with high resilience. It is somewhat resistant to mold, and decay as well as many chemicals, however it will sink in water and it will absorb and hold water, so can mold if left continually wet, but this is usually not the case unless it's a dive knife, and even then, exposure is usually limited.
Why Nylon everywhere? Why is so much nylon used in tactical accessories? Nylon comes in many colors, for one thing, polypropylene comes in only a few colors. Nylon is much easier to stitch on machines, and usually the fibers are much smaller. Nylon can be softer, and with more give between fibers also eases stitching, so is less labor intensive, and cheaper for the manufacturer. Polypropylene is pretty hard on the machines when stitching and fabricating. I've read here on the internet that nylon is harsher and more abrasive than polypropylene, but that is simply untrue. In my own experience the opposite is true. I suppose it also depends on the size of the fibers and how the strap is manufactured. Both are good textile fibers, and when combined with polyester (below) make great accessories.
I use heavy duty polyester or nylon upholstery thread (its high strength is important here). This is very tough stuff, and mostly, I use polyester, since it has much less stretch, and little fading or degradation in UV or sunlight, compared to nylon. I also use PTFE (teflon) and kevlar thread in extreme use applications. I don't use monofilament; it's an indoor thread.
Stitching takes a lot of forms, and I tend to over-stitch rather than under-stitch for strength. I'm not making clothing where the appearance of the pattern or color in the material is the desired effect so the stitches should be minimal or hidden. Instead, I'm making extremely durable, overbuilt textile accessories that work with metallic components (sheath clamps, mounts, frames, and gear). I want my stitching bonds to be as strong and durable as possible. At the time of this writing, I have four dedicated machines to accomplish a variety of stitching tasks.
When one thinks of a knifemaker, they seldom think of a tailor or a seamstress. All knives that are actually used must interface with modern gear, and that gear is not simply a belt that goes around a waist. Textiles, webbing, strap, tactical gear, mounts, PALS (Pouch Attachment Ladder Systems), and all the necessary gear is constantly changing an updating, and the knifemaker who makes actual rigs for tactical missions must upgrade with it.
Here are some other parts or components with details about their materials.
My tactical, combat, and professional locking knife sheaths really are the best in the world. There is only one way to make them better, and that is to offer more wear options and accessories as part of my commitment to service in this field. After discussing the needs with my military clients, there were several accessories they requested that they would like to have as useful, and even necessary adjuncts to their knife/sheath system. They did not want to try to find suitable aftermarket items; since there are so many poor knife sheaths out there, the chances of them finding anything commensurate and as durable as my sheaths were non-existent. Though some of the accessories made for custom firearm carry may be useful, they are not dedicated or designed for knife wear and use, so fit, arrangement, and usefulness is limited.
I have continued to add new options and accessories and will add new ones as they evolve. This tradecraft is never static, nor should it be. It is my honor to offer these items to my clients for their tactical, combat, professional, service, or survival needs.
Purpose: though my locking knife sheaths usually offer a variety of wear options, sometimes the knife user wants a more traditional, lower orientation of the knife at the waist, with the handle in a lower position. This accessory allows the knife sheath to be worn with the knife handle approximately even with the center of the belt line, much lower than with the standard aluminum belt loop mounts. The length of the extender can be set on an individual basis, but are not adjustable as the length is permanently stitched into the accessory. The extender is custom created for each knife, and because of the differences in each knife sheath, they are usually not interchangeable with other sheaths, even my own. It is a custom piece.
Please remember that this is only the Basic Below are some pictures of how the basic extender is attached to the tactical combat knife sheath.
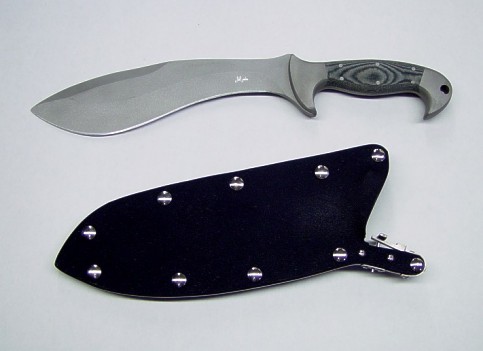
This is the typical combat knife that might use this type of accessory. The knife is a combat tactical Horrocks model, in bead-blasted stainless tool steel, with stainless steel bolsters and bead-blasted canvas reinforced micarta phenolic handle secured with stainless steel pins. The sheath is one of my locking combat waterproof models, with double-thick kydex over a 5052H32 corrosion resistant, high strength aluminum welt frame. The sheath is secured with nickel plated steel Chicago screws, and has an all-stainless locking mechanism with stainless steel hardware and spring. Read more about these fine sheaths on a special page here.
In the following illustrations, I'll demonstrate how the sheath mounted belt loop extender is attached to the sheath.
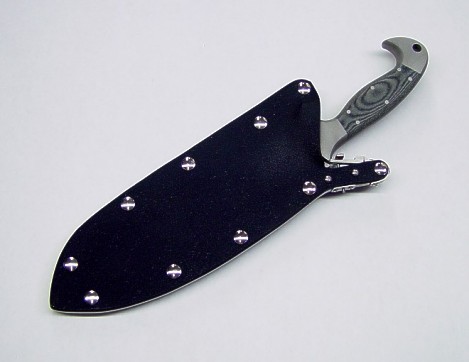
Here is the knife locked into the sheath. The handle is exposed for quick access, and you can see the lock mechanism is also exposed for the thumb to release it. This is the sheath front for typical right side wear, but the sheath can be reversed by simply mounting the belt loops on this side. In my newer sheaths, the die-formed high strength aluminum belt loops can also be repositioned in some of the lower sets of holes, so the knife sheath can be worn in an inverted position. Each knife varies, and these individual options are detailed on the knife's specification, photo, and description page.
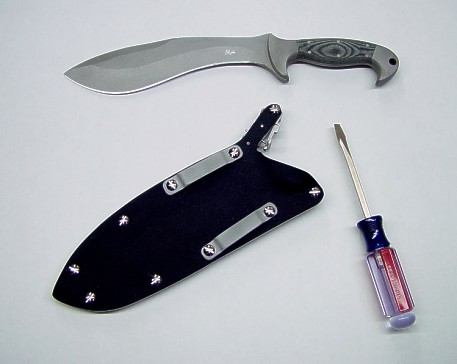
To mount the extender, you'll need a flat blade screwdriver. The sheath is turned over here so you can see the slotted screw heads of the Chicago screws.
Important note: do not remove the top screw that is integral with the locking mechanism. Parts of the mechanism are assembled under tension and can not be removed. Removing the screws securing the belt loops is no problem and that is what you'll be doing next.
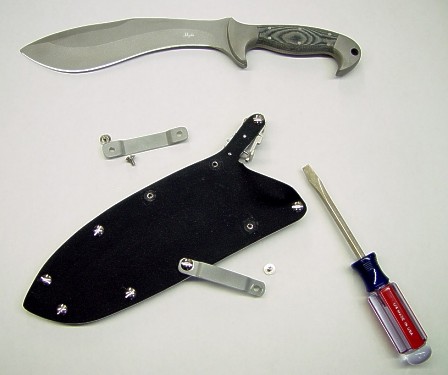
Here the Chicago male screws and aluminum belt loops are being removed. Do not worry about orientation or individual placement of the belt loops. Unless you have an older model of my locking sheath (before 2003), these aluminum belt loops are interchangeable on each individual sheath. It's important to note that only the male part (screw) of the Chicago screw goes through the belt loop, and not the female part (the nut). The male screw allows some movement and adjustment of the belt loops.
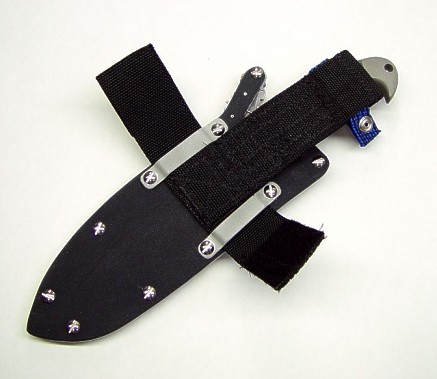
The sheath extender is placed under the aluminum belt loops and the screws are reattached. The screws do not need to be super tight, save your he-man strength for combat. Good and snug is all that is necessary. You might wonder why you had to remove the aluminum belt loops at all. Why not just thread the arms of the extender through the loops? Because of the thickness, size, toughness, and industrial strength Velcro (hook and loop) pads, you can't do this; there simply is not enough room. In fact, the extender can not be removed once the belt loop screws are tightened.
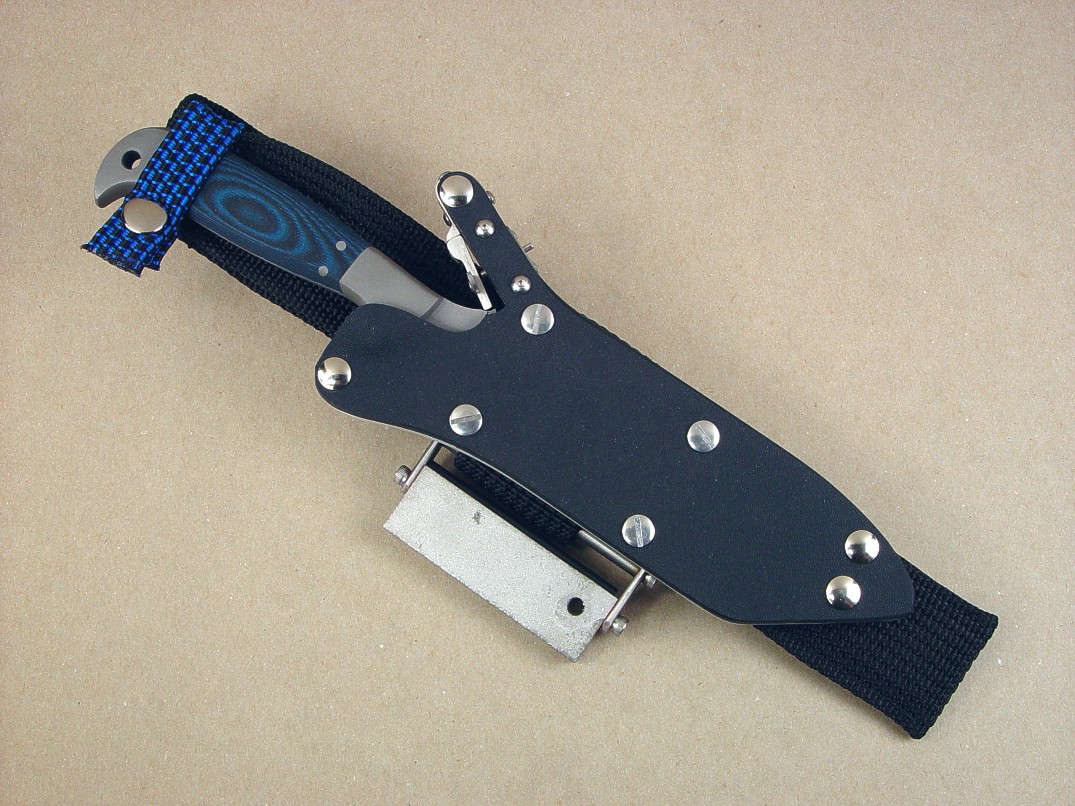
This is one of the custom measures that allows the extender only to be used on the individual knife sheath. The tolerances are very tight. The extender is placed so the anti-flop elastic shock cord (also called bungee or ockky strap) is wrapped and snapped around the knife handle. The shock cord in this photo is blue.
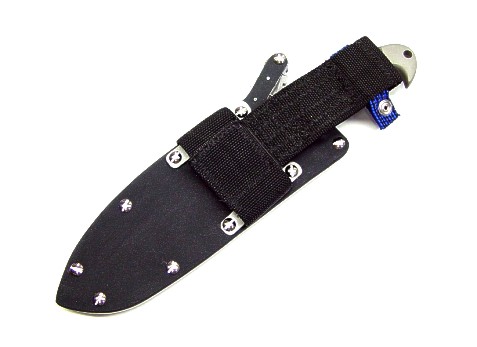
The Velcro pads are now closed over each other to fully secure the extender to the sheath. The strength of the extender does not rely upon the Velcro, the Velcro is there as an additional fastening agent for security. It also pads the back of the sheath extender where it might ride against the body.
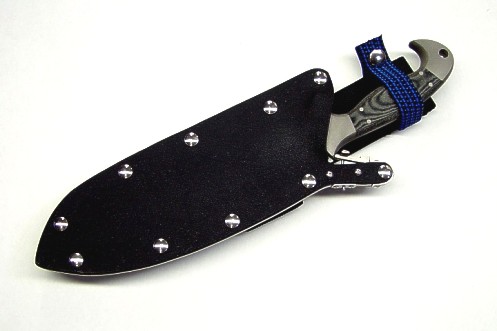
The polypropylene/nylon/shock cord extender ready for wear. The blue shock cord is flat and strong, and is secured through and independent sewn tube in the upper end of the extender's belt loop. It's held there by tension and because it has nickel plated steel snaps on the ends that will not easily slide out. This allows the shock cord to be removed if desired, or replaced if worn or deteriorated.
The purpose of the shock cord (also called bungee, elastic cord, or ockky strap) is to keep the handle from flopping around away from the body when the wearer is active. It is not a security measure to assist or replace the stainless steel locking mechanism on the knife sheath.
The photo set below illustrates how my locking sheath belt loop extenders are worn and used.
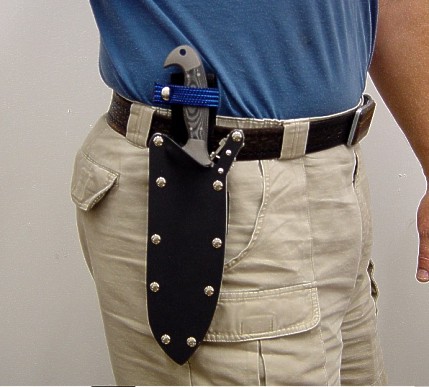
Here's a typical wearing style for the sheath extender and tactical knife, right side, blade back. Note how much lower the extender sets the handle than the aluminum belt loops. The handle is nearer to the belt line, rather than high by the ribs. The extender should not be too long, or the lower tip of the sheath will flop around and need to be secured to the thigh.
Currently, I do not make thigh straps, as they may interfere with movement in the field. Also, a couple guys have asked if I could make the height adjustable. I think this is a bad idea, as that would weaken the whole vertical riser on the extender. I'd have to use something like Velcro, which could cause critical noise if the knife sheath is tugged, caught, or trapped. If the adjustment was made with metal fittings, this would concentrate the tension on the point of the metal fasteners, and they would wear. We've all seen many rivets and grommets fail this way on military webbing belts. Metal could also rub and abrade the clothes and gear beneath it, against the wearer. I also wanted the extender to be as strong as the aluminum loops and the locking mechanism. Adding adjustable height to the arrangement would weaken it.
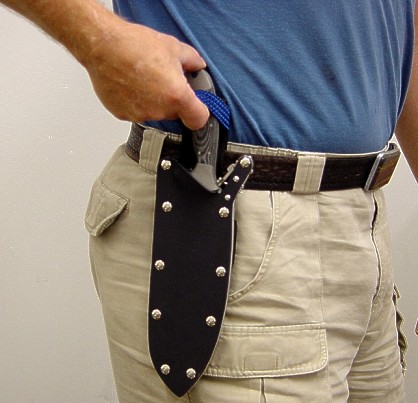
Here's how to remove the anti-flop shock cord. A simple pull and the cord is pulled over the top of the rear bolster. A lanyard should not be used when the knife is worn this way, it may interfere with the shock cord. Another way to remove the shock cord would be to unsnap the nickel plated steel snap at the rear of the shock cord. The color of the shock cord is a visual aid that helps the wearer to assure the handle is secured against the extender. Remember, even with the shock cord removed, the knife is still secure in the sheath. Even with the shock cord snap unsnapped, the shock cord can not be removed from the tube without tremendous effort. It's flat and tight. Round shock cord would not work here.
Notice also that the snap is oriented to the back of the knife handle. This can prevent the shock cord from hanging up and snagging in brush, or close areas. If the sheath and extender were reversed, the shock cord and snaps can be pushed through the sewn pocket at the top of the extender, and mounted in reverse, keeping the correct orientation for left side wear.
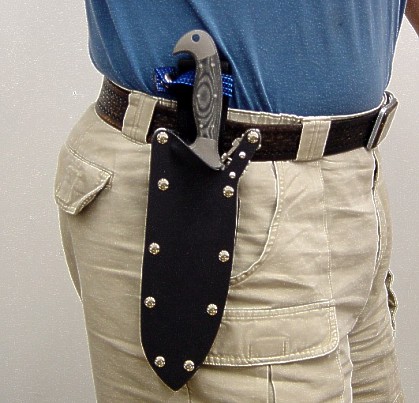
The anti-flop elastic shock cord snaps out of the way of the handle after it is released. This is important since retaining straps on sheaths frequently get in the way of the knife blade when removing and inserting the knife from the sheath. This is a sore spot with most knife wearers, and on my Sheaths and Combat Knives page, I state that snap/loop retention of knife handles should be outlawed. The knife blade will eventually contact and cut through this kind of sheath strap. With my arrangement and use of this type of shock cord, that won't happen.
Remember, the shock cord is not used to retain the knife in the sheath, the stainless steel locking mechanism is. The elastic is pulled tightly out of the way of the knife handle and blade, and is snug against the belt loop extender, staying out of the way of the hand and blade.
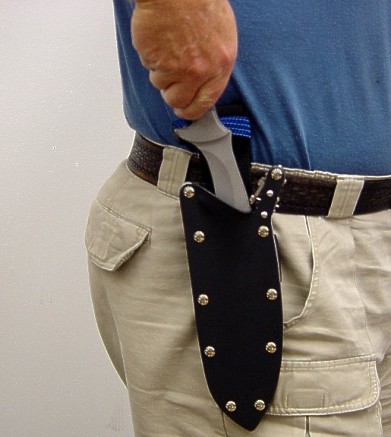
With the anti-flop shock cord out of the way, the knife is easily unlocked with the thumb and removed from the sheath. Here's where the stiffness of the polypropylene and the multiple layers and heavy stitching reinforce the extender. When you pull up on the knife, a weaker, thinner extender would buckle, allowing the sheath to flop outward away from the body. In military style pistol loop extenders, sometimes a piece of plastic or aluminum is sewn into the layers to stiffen them. For my extender, I did not want to hassle with metal or plastic, I wanted the entire extender to be tough yet comfortable as well as allowing the textiles to breathe and thus dry out if wet. The double layers and the multiple cross triple zigzag stitching stiffens the entire vertical length. The extender is light, simple, and comfortable to wear.
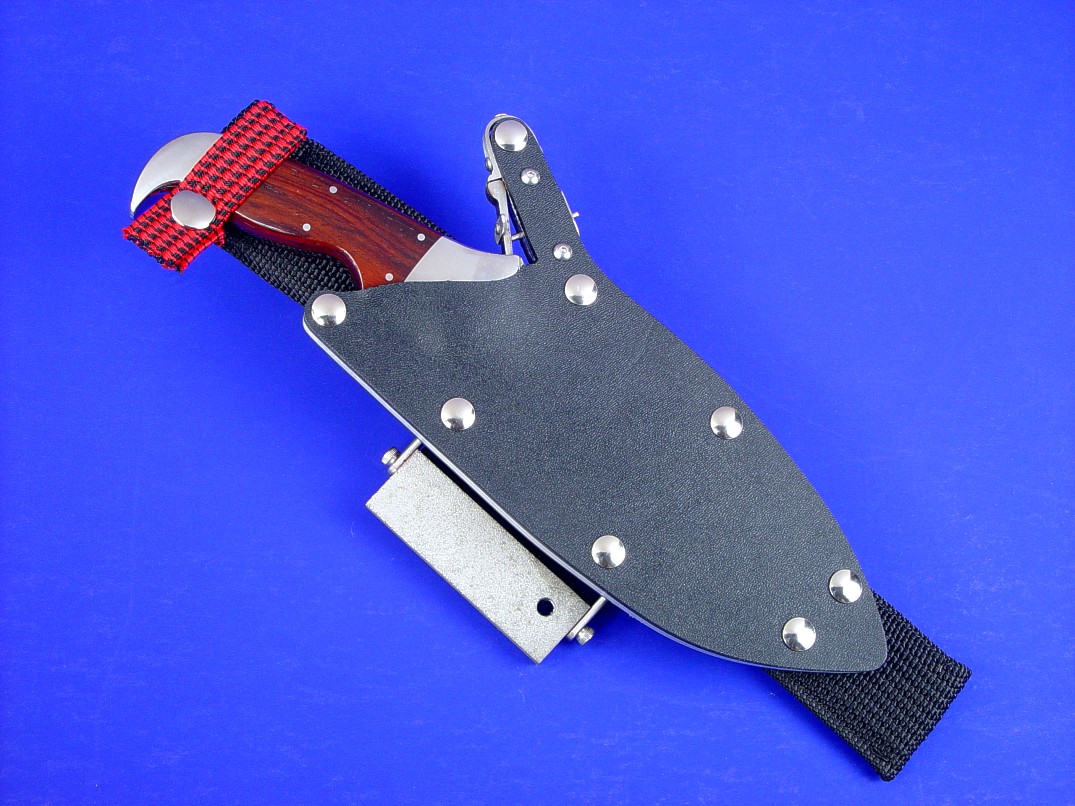
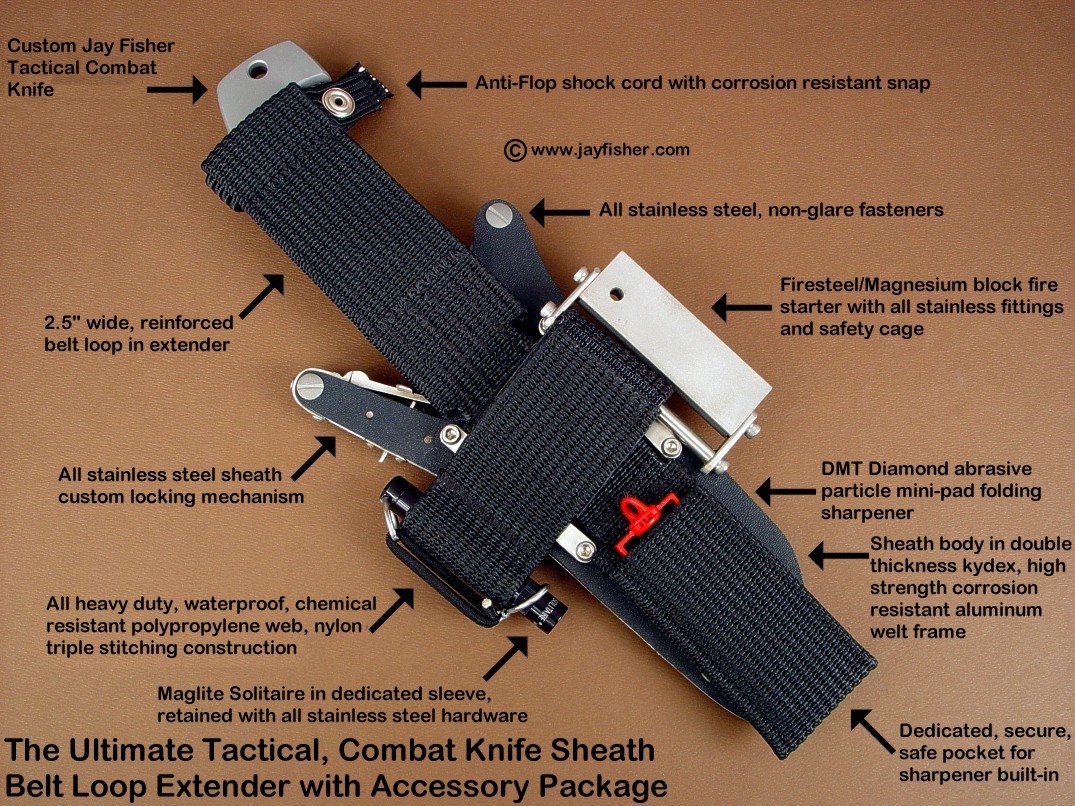
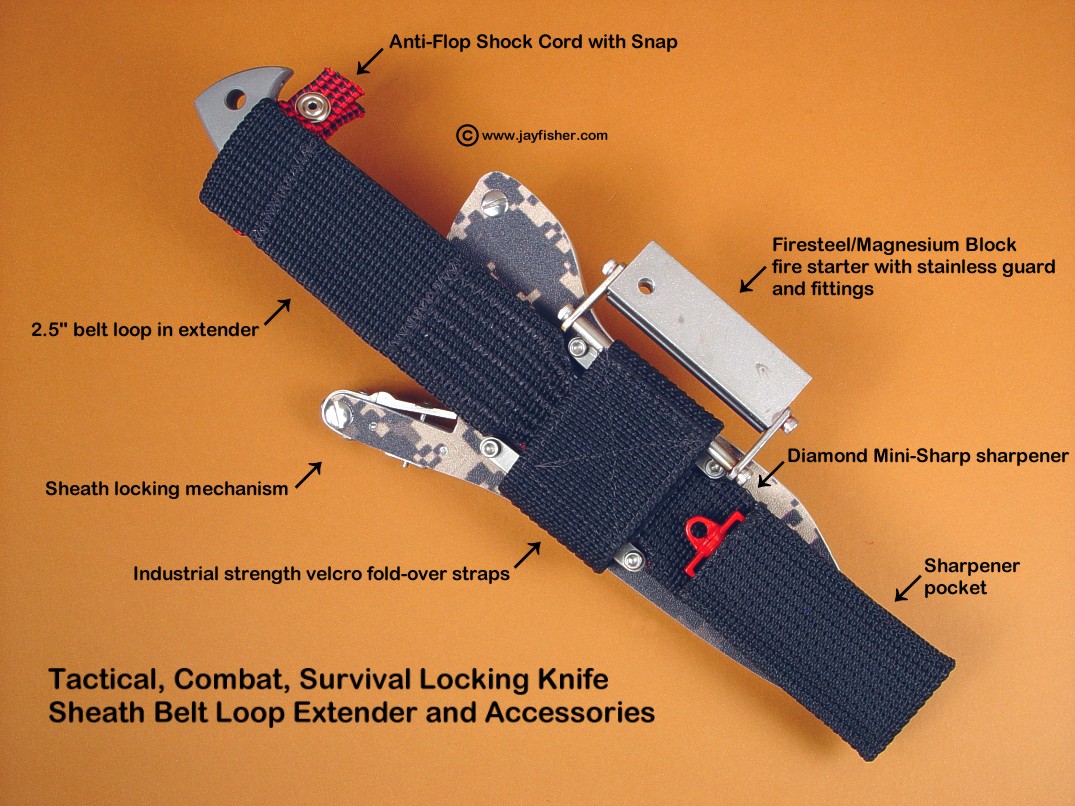
The ultimate tactical, combat, and survival knife sheath belt loop extender is designed and functions like the basic belt loop extender above, but with some important added features and devices. The extender is mounted by replacing the aluminum die-formed belt loops with heavy, counter-bored 304 stainless steel bars and 18-8 stainless steel machine screws. This gives the accessory more room for the Firesteel/Magnesium block fitting at the industrial strength Velcro fold-over pads. Additionally, there is a special dedicated pocket at the extender's bottom to secure a DMT Mini-Sharp diamond abrasive hone. These accessories are described in the sections below. Here's how the ultimate is mounted:
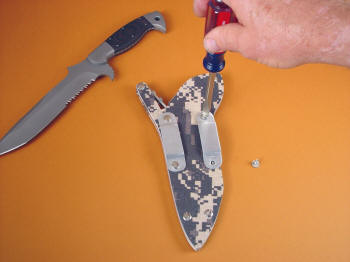
Be certain to lay the sheath on a non scratch surface to protect the dyed image and sheath front from scratches.
To convert the sheath from its standard die formed aluminum belt loop configuration, use a flat blade screwdriver to remove the existing stainless steel Chicago screws and belt loops. Be careful at all times to not scratch or gouge the surface dye of the digital image on the kydex sheath if so equipped. Leave the female (nut) portions of the Chicago screws in place.
Please click on thumbnail photo at left for larger image or more detail.
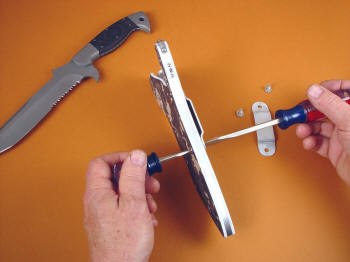
Ordinarily, most Chicago screws have only a plain domed head on the female component (the nut). But in these special solid 304 stainless steel Chicago screws, I've modified them for a slot on both sides. This allows more pressure to be applied in both loosening and tightening the Chicago screw. Be very careful if you have to do this, the screwdriver can slip and mar or gouge the finish of dye surface of the kydex.
Please click on thumbnail photo at left for larger image or more detail.
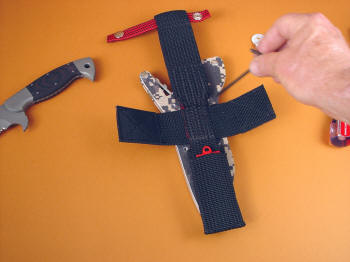
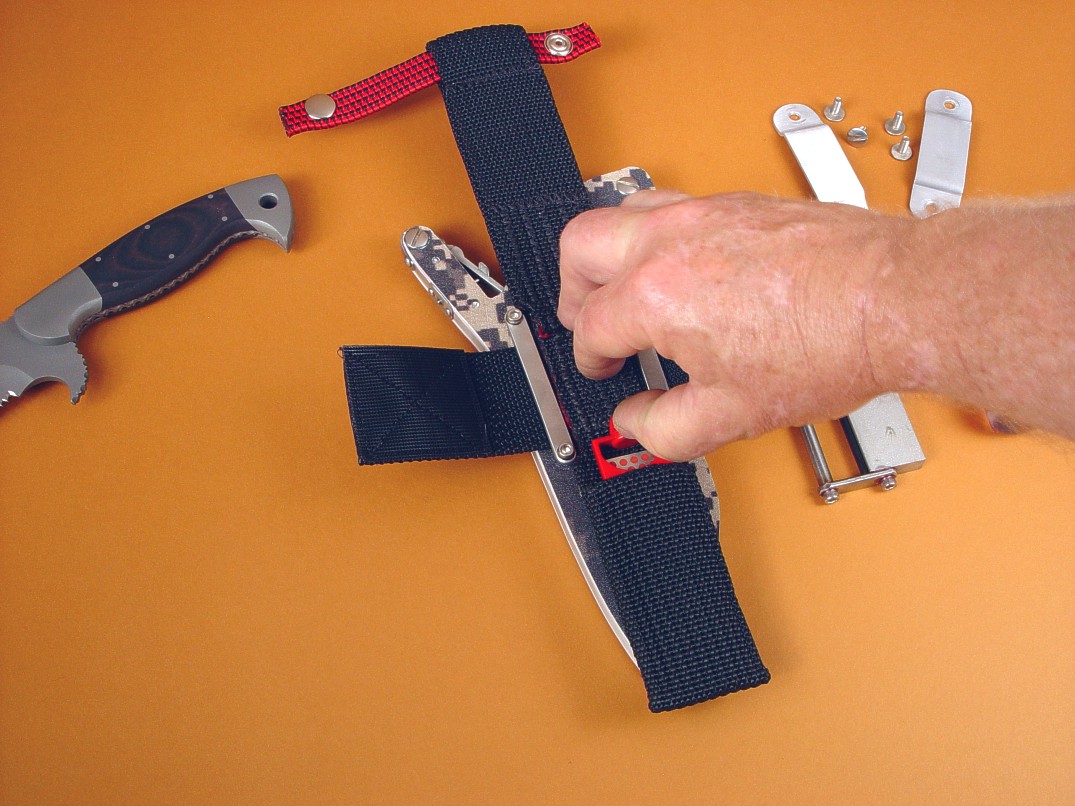
The knife sheath belt loop extender accessory is positioned at the sheath back. In the photo, the allen wrench (or hex key) is pointing to the cut-outs along side the vertical length of the extender webbing where the Chicago screws are located on the sheath back. The extender must be positioned so these areas are clear. Be sure to position the extender with the pocket containing the DMT MiniSharp sharpener up, and not against the sheath. The photo set shows the positions of the sheath and extender for right side wear. For left side wear, the Chicago screws are reversed, and the sheath flipped over. The red shock cord with snap at the top of the extender would have to be reversed also.
Please click on thumbnail photo at left for larger image or more detail.
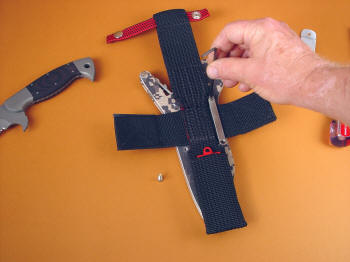
For this accessory, I've included special mounting bars made in brush-finished 304 stainless steel. These bars fit only the sheath that they were designed for, and allow a tight and very secure mounting with absolute corrosion resistance. The bars have counter-bored sockets for the socket head cap screws, so be sure those are oriented to accept the screw heads (refer to photo). These machine screws are also 304 stainless steel, so the entire assembly is highly corrosion resistant. The bars are placed alongside the vertical webbing, and you can see the cut-out areas where the screws will clear the webbing. Leave the socket head cap screws loose until all are started and you are sure of the position of the webbing. The 9/64" allen wrench (or hex key) is included.
Please click on thumbnail photo at left for larger image or more detail.
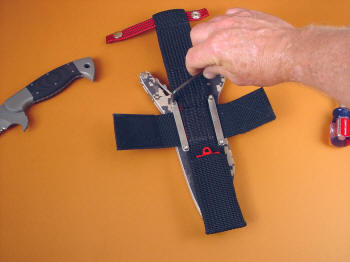
Use the included 9/64" allen wrench to tighten the socket head cap screws evenly. Do not over-tighten; because these are all stainless steel, it would be easy to apply too much pressure and deform the aluminum welt frame of the sheath. A few tugs of the webbing of the extender and you can see how solid it all is. If you've over-tightened, the knife can also bind in the sheath.
Please click on thumbnail photo at left for larger image or more detail.
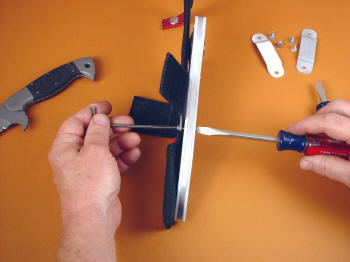
Sometimes, the Chicago screw female component will slip, and you can hold it with the flat blade screwdriver. As mentioned before, be very careful and do not let the screwdriver slip or it can gouge the kydex.
Please click on thumbnail photo at left for larger image or more detail.
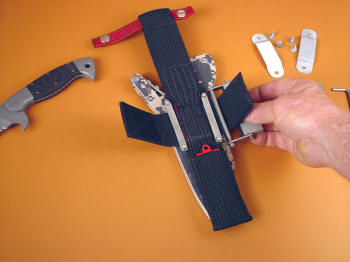
The fire starter can be mounted to either side of the webbing, and the industrial strength Velcro padding holds it against the stainless steel bars you just mounted. It can swivel around a bit, allowing more comfortable positions, but it does not rotate in its own frame. This is a safety feature I've described below. The fire starter can also be mounted on just about any fixture or fitting, or anywhere along the belt loop or utility straps.
Please click on thumbnail photo at left for larger image or more detail.
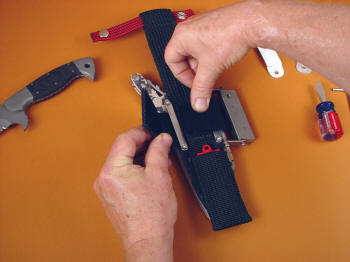
Pull the Velcro hard against the rod of the fire starter, and fold over to lock.
Please click on thumbnail photo at left for larger image or more detail.
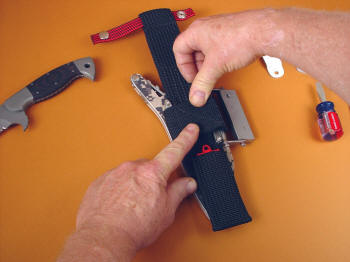
The Velcro holds the webbing in place, the webbing secures the firestarter. Just as in the basic locking sheath belt loop extender detailed above, the Velcro is not mechanically needed to secure the extender to the sheath, the stainless steel bars do that. It does help to pad the sheath back, secure the fire starter, and lock in the diamond sharpener.
Please click on thumbnail photo at left for larger image or more detail.
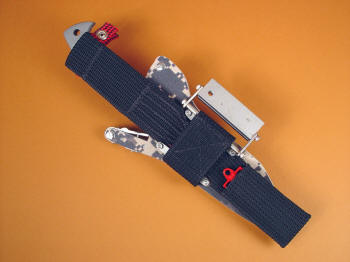
To the left is what the assembly looks like completed. Note how the velcro closure will prevent the DMT Mini-Sharp sharpener from coming up and out of its pocket. The added padding also helps keep the sharpener head and the fire starter away from the body.
Please click on thumbnail photo at left for larger image or more detail.
“Better to have, and not need, than to need, and not have.”
--Franz Kafka
Writer, 1883-1924
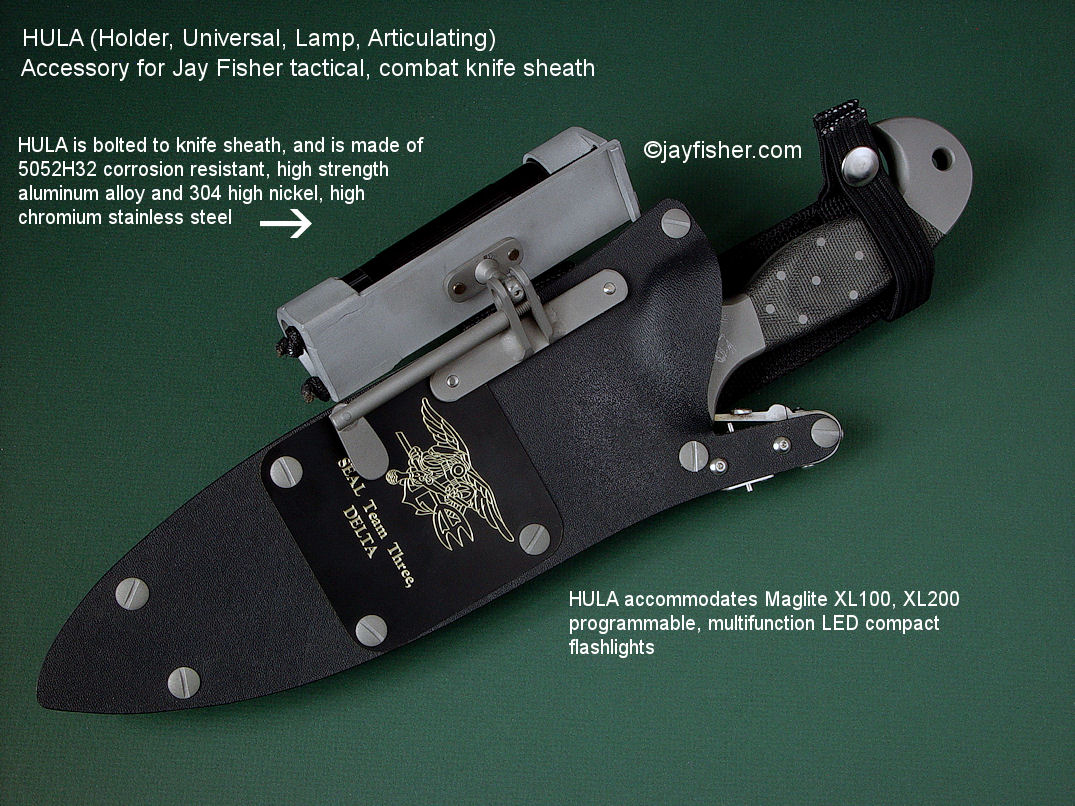
When I started adding the Maglite® Solitaire® to the Ultimate Belt Loop Extender, it satisfied a need for a lightweight, compact, and handy emergency lamp that would be there for occasional illumination needs. Then, several clients asked if it would be possible to create a key lamp accessory, a holder for a main lamp that would be up to the needs of daily tactical, rescue, or combat use. I realized that this was a critical need for a variety of reasons. Typically, a tactical flashlight (or torch for you Brits) seems to occupy five spaces on the professional.
These are the reasons I created the sheath-mounted HULA.
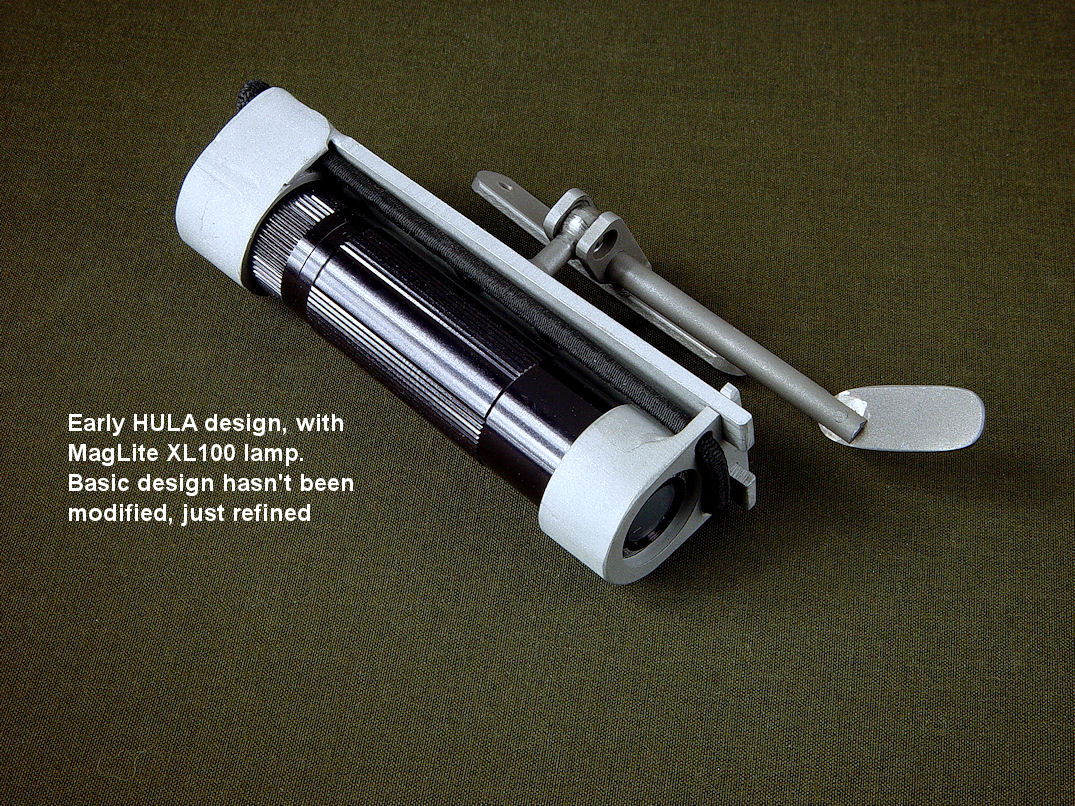
The HULA (Holder, Universal, Lamp, Articulating) was designed to mount on my tactical, combat, rescue, and survival knife sheaths, to be a main key lamp accessory, with an articulating wide adjustment, lockable, aiming, quick and reliable removal, and versatile wear and location options, while being highly corrosion-resistant and extremely strong. Here are the features and the reasons I make them this way:
In the photo set below, you can see just how this critical accessory is used with my locking knife sheaths in a typical wear location arrangement. The HULA is quite versatile when worn on the hip, but please remember that the HULA is even more versatile when worn on a tactical vest, PALS vest on body armor, or on any gear that can accommodate the locking tactical knife sheath. The photo annotations are clear and self-explanatory.
While the angle of the frame of the HULA allows it to extend outward from the sheath to clear the sheath and body for aiming the lamp, it also allows the ball joint to position the HULA flashlight holder behind the sheath. In essence, in the first photos below, you can see how the holder is folded back to actually be behind the sheath. Worn in this position, the HULA flashlight holder is out of the way, behind the sheath, and thus does not protrude greatly. This reduces the possibility of snagging the HULA or sheath on debris, brush, or obstacles.
The next thing I had to do was find a lamp that was up to the task. I went back to Maglite®, the USA company that is the founding venture of all fine tactical lights. Their line of compact programmable multi-mode XL lamps was just the ticket. These flashlights have intense, yet dimmable beams created with LED technology that is quite impressive. They have worthwhile functions and controls that are useful and necessary in tactical and emergency situations.
The physical size and construction of these Maglites are well-thought out. They have anodized aluminum barrels, and O-ring seals to keep moisture out. They have 1 meter fall impact resistance, and the brightest one illuminates with 172 lumens at 138 meter distance. They have somewhat limited flood to spot focusing, but with their intensity, this is effective. There are some comparisons that will help the user decide on which one to select, as they are included with the HULA.
There are other factors that must be considered in the choice of lamp, mainly the operational modes of these two lamps. They both have the same programs (modes of operation) including:
However, the switch operation is different.
The XL100 mode choice depends on the horizontal position of the flashlight body around its axis. To select, a small nib of rubber on the switch must be located by sight or feel, and the barrel rotated around its axis in different directions (like the face of a clock) for different modes. This may be troublesome to learn, but the advantage is that it only requires one click of the switch.
The XL200 mode choice is determined by rapid clicking of the switch. This has the advantage of operating any mode when the flashlight is in any position, but the drawback to this is that the rhythm of the clicking must be controlled. Click too fast and it does not recognize the signal, and click too slow and the lamp simply turns on and off. Also, in quiet or subdued activity situations, lots of clicking may telegraph a position.
No matter the choice, both of these are great lamps, and worthy of the sturdy and sophisticated HULA knife sheath accessory. My commitment is to offer the very finest accessories to work with the finest knives, sheaths, and professionals who depend on them to be the very best. The finest, most durable accessories are not cheap; it is not my goal to make the economical, but only the very best.
See the comparisons of the Maglite® flashlights below.
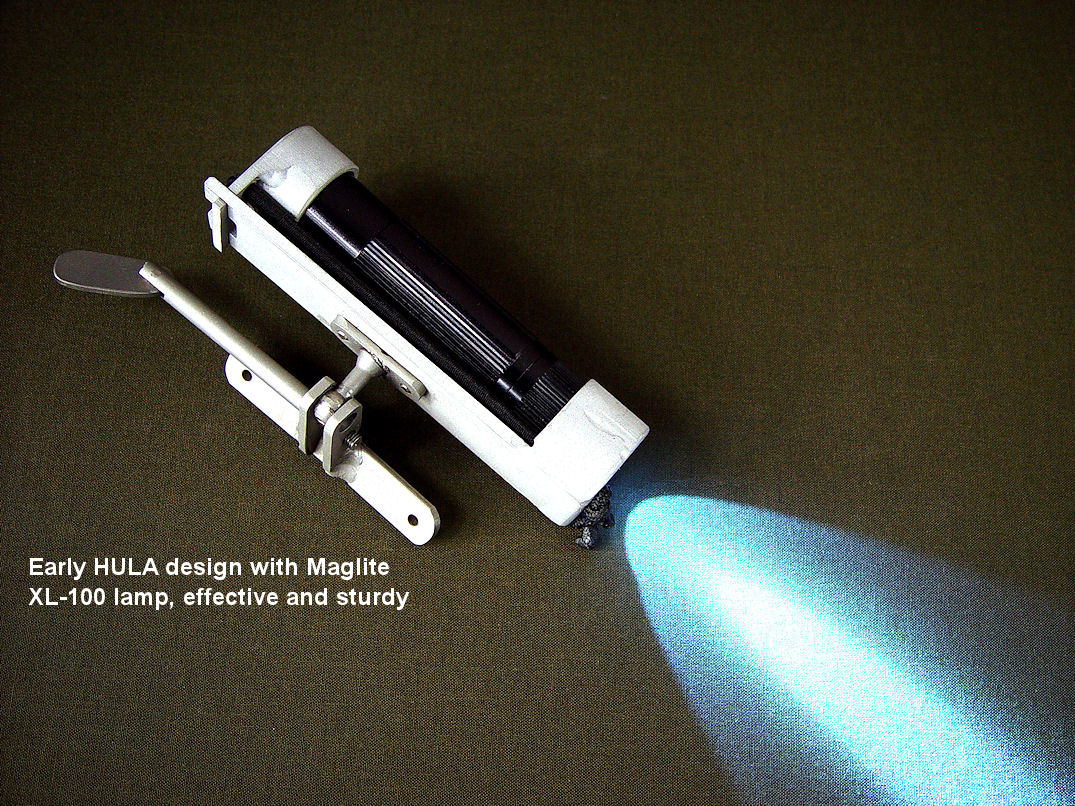
Answering the needs and suggestions for my counter-terrorism teams, I modified my HULA frames to accommodate the new MagTac (PB) tactical flashlight made by Maglite®, as well as the XL series made by Maglite®. I started making these upgraded HULAs in spring of 2013. The HULA is simply a bit longer, with a larger lamp socket for the slightly larger size of the MagTac's lens assembly. My new series of HULAs fit both lamps (XL series and MagTac).
The MagTac (PB) is a formidable lamp. It has an intense beam, but does not have the many operational features of the XL series lamps. Consequently, many of my professional clients are requiring both types of lamp for various excursions, missions, and outing expectations and needs. The MagTac does not have the signaling, flashing, strobe, or inertia operational controls. It has three basic modes:
Just how does this lamp excel? Mainly output, that's how. Raw, intense lumens.
The MagTac (PB) puts out an amazing 310 lumens, that's nearly twice the intensity of the XL200. A shock of intense light that can stun, disorient, and even temporarily blind the subject of a counterterrorism operation; it's no wonder why some of my tactical CT teams request this lamp. This is the MagTac's main advantage, and the light beam reaches out nearly two football fields in high setting. There is a lower setting as well (PowerSave), which preserves battery life. The batteries used by the MagTac are CR123, the most popular battery for military night vision, firearm lamps, laser indicators, and other tactical gear, so while being more expensive than the AA or AAA series of battery, they mesh well with tactical operations and supply. The CR123s are becoming more popular as more and more lamps are moving to high intensity LED technology, requiring more power, higher voltage, and longer life.
Here's a chart comparing the MagTac with the XL200 flashlights. Remember, both of them fit my latest HULAs.
| Feature | Maglite® XL200® | Maglite® MagTac |
| Candela (Peak Beam Intensity) | 4737 | 8293 |
| Lumens (Light Output) | 172 | 310 |
| Beam Distance (Throw) | 138 Meters | 182 Meters |
| Run Time (Battery Life) Low Power | 218 hours | 17 hours |
| Run Time (Battery Life) High Power | 2 hours, 30 minutes | 4 hours |
| Impact Resistance (Drop height) | 1 meter | 1 meter |
| Enclosure Protection Against Water | IPX4 (Water Resistant) | IPX4 (Water Resistant) |
You can see that the cost of intensity is battery life, even at the lowest power setting. This is why my counterterrorism teams also request the Maglite® LED Solitaire and the LIMA or UBLX with a Solitaire mount. An additional light in any emergency situation is always necessary, and a warm feeling to know it's there, even if you don't need it!
One more consideration about the MagTac. Though the drop height impact resistance is the same for both lamps, this probably refers to the internal component durability. The exterior of both lamps is quite different. The MagTac is made of heavier, thicker anodized aluminum, with deep milling cuts on the body, which is flat finished and not as slick and smooth as the XL series. This seems to be a much sturdier lamp, and better suited to tactical use, at least on the outside. Now if Maglite® could only combine all these features of both lamps, with a heavier body, and greater impact resistance and resistance to water, they would have a winning combination that would replace all contenders. Perhaps in the future; we'll see.
Maglite® expanded their series of lamps to compete with other companies making high intensity lamps. The MagTac line then expanded, and now has several flashlights that are valuable in the tactical field. The MagTacs have two basic models, and the difference is determined by the bezel on the lens end of the lamp. The plain bezel (PB) model is smooth and even at the tip of the ring of metal surrounding the lens, the crowned bezel (CB) has milled arcs of material cut out of the metal surrounding the lens. The plain bezel is shorter in length than the crowned bezel. There is one substantial difference in the two MagTac lamp series, and that is though the CB model puts out a little more light, it has no low power setting. This means that frankly, it chews through the CR123 batteries at four hours no matter how you use the lamp. This means that the user has no setting control, no dimming, no prolonging of battery life, whatever. This is probably why so few of my clients request or use the CB (crowned bezel) model. The CB model has momentary, full power, and strobe functions, and the PB (plain bezel) has momentary, full power, and low power. The big difference, then, between these two flashlights is that the CB has strobe, and the PB has low power option. If strobing is something required, most of my clients consider the XL200, which has many more functions (including strobe and motion sensing and signaling and variable intensity), but at the expense of a lower lamp output.
| Feature | Maglite® XL100® (Discontinued!) |
Maglite® XL200® | MagTac (PB) (Plain Bezel) |
MagTac (CB) Crowned Bezel |
| Candela (Peak Beam Intensity) | 4484 candelas | 4737 candelas | 8293 candelas | 9267 candelas |
| Lumens (Light Output) | 83 lumens | 172 lumens | 310 lumens | 320 lumens |
| Beam Distance (Throw) | 134 Meters | 138 Meters | 182 Meters | 193 Meters |
| Run Time (Battery Life) Low Power | 201 hours | 218 hours | 17 hours | N/A |
| Run Time (Battery Life) High Power | 5 hours, 15 minutes | 2 hours, 30 minutes | 4 hours | 4 hours |
| Impact Resistance (Drop height) | 1 meter | 1 meter | 1 meter | 1 meter |
| Enclosure Protection Against Water | IPX4 (Water Resistant) | IPX4 (Water Resistant) | IPX4 (Water Resistant) | IPX4 (Water Resistant) |
What these standards mean:
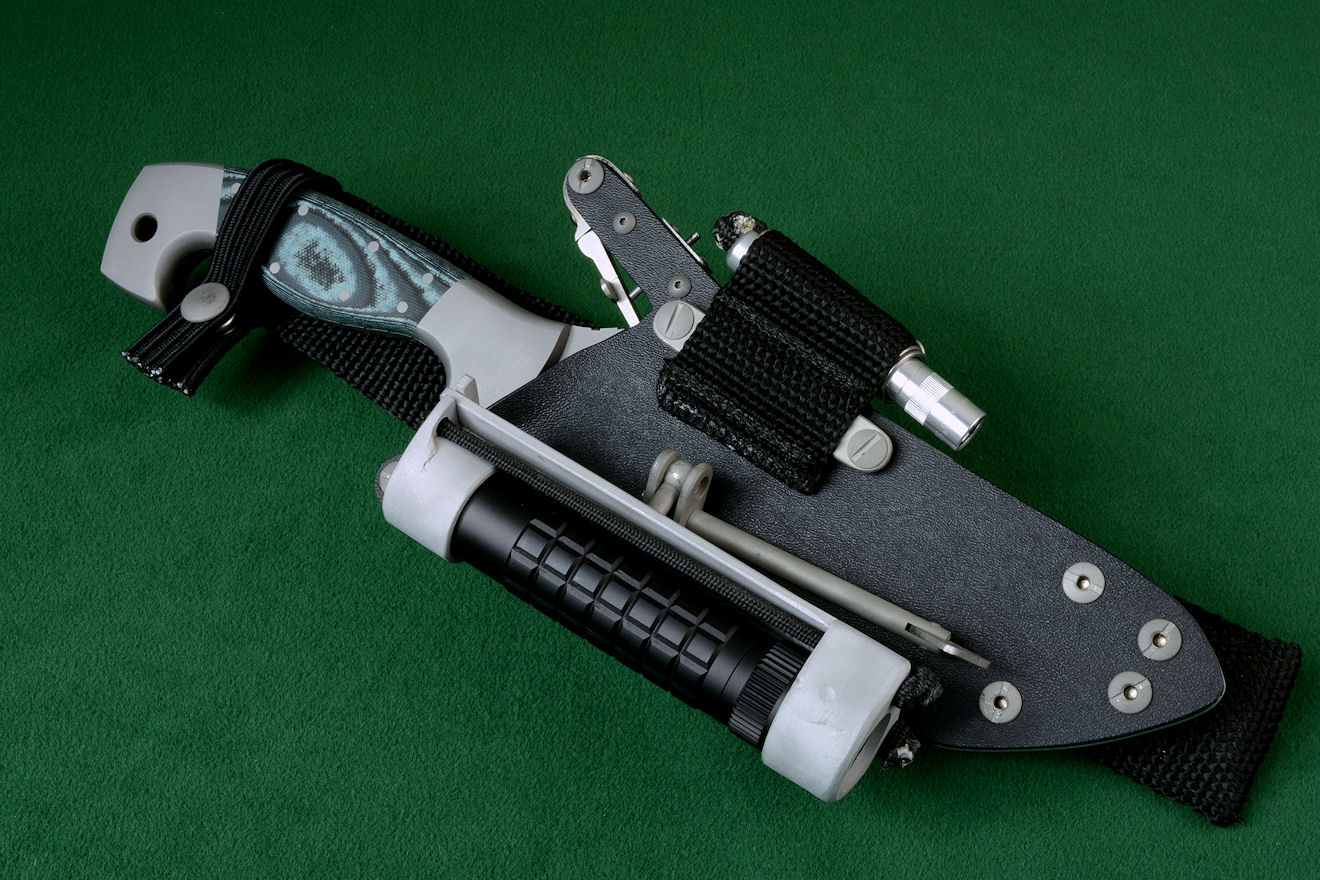
Because the HULA is of a fairly standard size of lightweight tactical flashlights, there are other lights that can be used instead of the Maglite® brand. Another player in the tactical flashlight field is Fenix. As with everything, there are pros and cons about using any lamp. A Fenix lamp that fits the HULA is the E35, and I chose the deluxe edition for this comparison. This is a lamp that (at the time of this writing) sells for under $50, so it's less expensive than the MagTac.
One of the big advertising promos that made me purchase one for comparison is the lumens. The Fenix E35 is rated at maximum lumen output of 900 lumens, that's nearly three times the light output of the MagTac. It uses the same batteries, (CR123) or can be outfitted with a rechargeable Lithium Ion battery. So, nearly three times the light output on the same frame? I was certain to buy one to test it out. Sadly, I believe this lamp has a limited use potential in the tactical field, though some units and circumstances may prefer it. Why? I don't know how they measure the light output, but next to the MagTac, the 900 lumens seems weak!
It's probably due to the reflector. The MagTac focuses the beam better, so the throw of a core of intense light is farther, brighter, and potentially more useful. The Fenix E35 scatters the light into a wide flood, so the intensity drops off severely. There is no possibility of focusing this lamp in any way, so it's a short range flood lamp. Like I mentioned, it may be more suitable in closer environments (like room illumination, scene illumination, and disaster response) and this may be where this lamp excels. But to reach out and illuminate at a distance, its performance is far less that the MagTac because of scatter.
The E35 does have some other features that are superior (or are largely considered superior) to the MagTac. One is the lens. Instead of plastic like the MagTac, the lens is a tempered glass, and is fairly well protected. The discussion about plastic vs. glass lenses is a heated one. On the one hand, plastic can scratch easier, glass does not. Glass can shatter, plastic does not (usually). On both lamps, the lens is set in deeply enough to protect it a bit. But the big factor here is that the E35 having a glass lens and O-ring seals has an immersion rating of 1 meter where the MagTac only has splash resistance. This is a big deal in wet, marine, and disaster response environments.
The E35 has a heavily textured body, and some might find this attractive. Both lamps are fairly lightweight, but the Fenix is substantially lighter (3.5 oz. vs. 5.1 oz. for the MagTac). The Fenix will also chew through the batteries at nearly half the time at max output, and max output (900 lumens) can only be achieved by physically holding in the button, so requires the use of your hand.
The E35 does have three lower settings, and the switch sequence is not hard to become familiar with. The output is not variable like the XL200, but the intensity settings are remembered from the last time the light was turned off, so you have some control over the sudden unwanted burst of light.
An important point is that the E35 is operated with a switch on the side of the barrel. This means that in tactical use, leaning against something can turn it on. I wrote "leaning" because just bumping into something won't turn it on as it takes one half of a second at least to turn it on, so just brushing or bumping against something won't turn it on. However, I would be remiss in letting you know that this is not a flashlight I would recommend for combat. Combat at night requires stealth, and there isn't enough restriction control of this light for combat stealth. Of course, in survival, hazardous rescue, disaster response, and other nighttime use, stealth does usually not matter.
Conclusion: Both lamps will fit my latest HULA assemblies. If you're intending on scene illumination in wet environments (hazardous materials emergencies, disaster response, flooding a room with illumination, wide beam needs) the Fenix is a good choice. For all other tactical use, the MagTac is hard to beat. Both fit the HULA, you might need both to get the scene response you need!
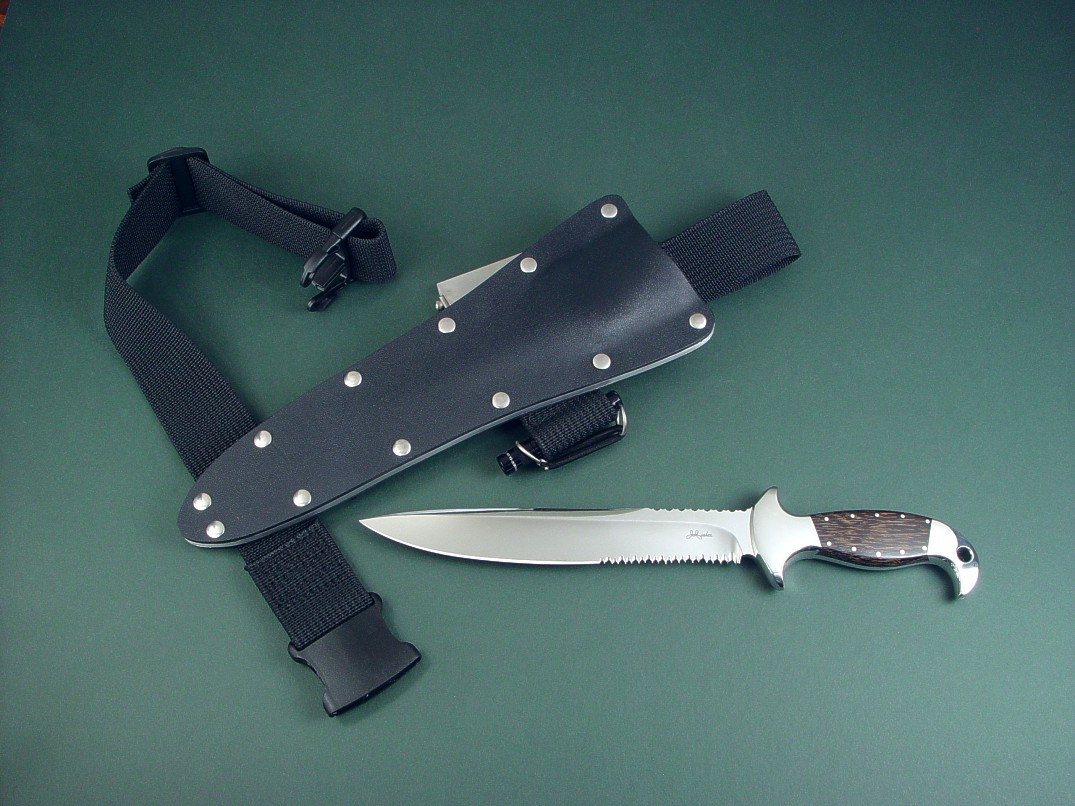
For very long knife blades, I offer a reasonable, practical, and worthwhile solution for realistic wear. The problem with most of the long knife sheaths for this type of knife is that when the sheath is long, the bottom (tip) of the sheath can flop around. The solution to this is to anchor the sheath to the thigh. Other makers and suppliers of this type of sheath are woefully inadequate, using lace, cord, or other straps to accomplish this critical job. That is simply not good enough, and here are the reasons why:
How would the best leg and thigh strap work on a long-bladed knife sheath?
To learn more, please look at the group of thumbnail photos of my thigh belt and wear demonstration below.
The locking knife sheath sternum harness was designed and made to answer a need some tactical clients have to wear the knife with the handle down, located across the sternum. This is not quite as easy as one would think, because there is no sash, frame, webbing, or arrangement made commonly today that will allow this very simple wear. So I designed and make these useful and simple accessories for my locking sheaths. Obviously, these would not work on any sheath that does not positively lock the knife into the sheath.
This is not some simple little necklace that allows a neck knife to be located in the neighborhood of the clavicles. This is a serious, stout, and extremely strong webbing that can support the weight of 5 men. It's woven polypropylene, with thick ABS plastic fittings. Because there is no give or stretching and no break-away components to this harness; it is waterproof, mildew and rot resistant, lightweight, and extremely durable. Please note the following warning and disclaimer:
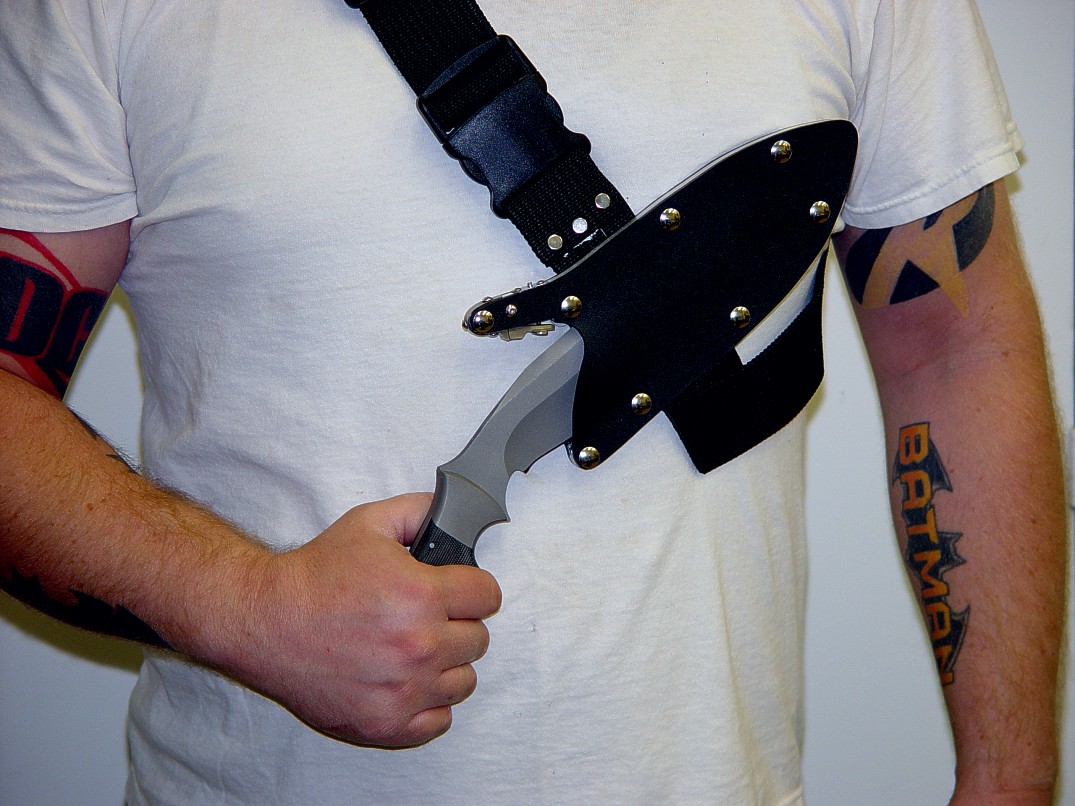
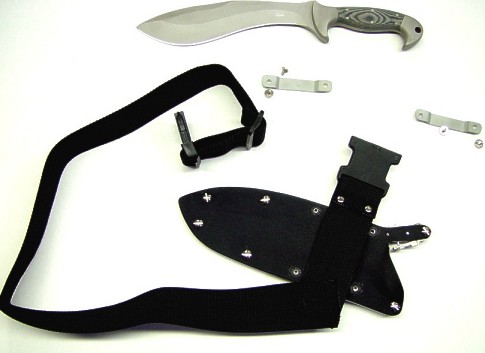
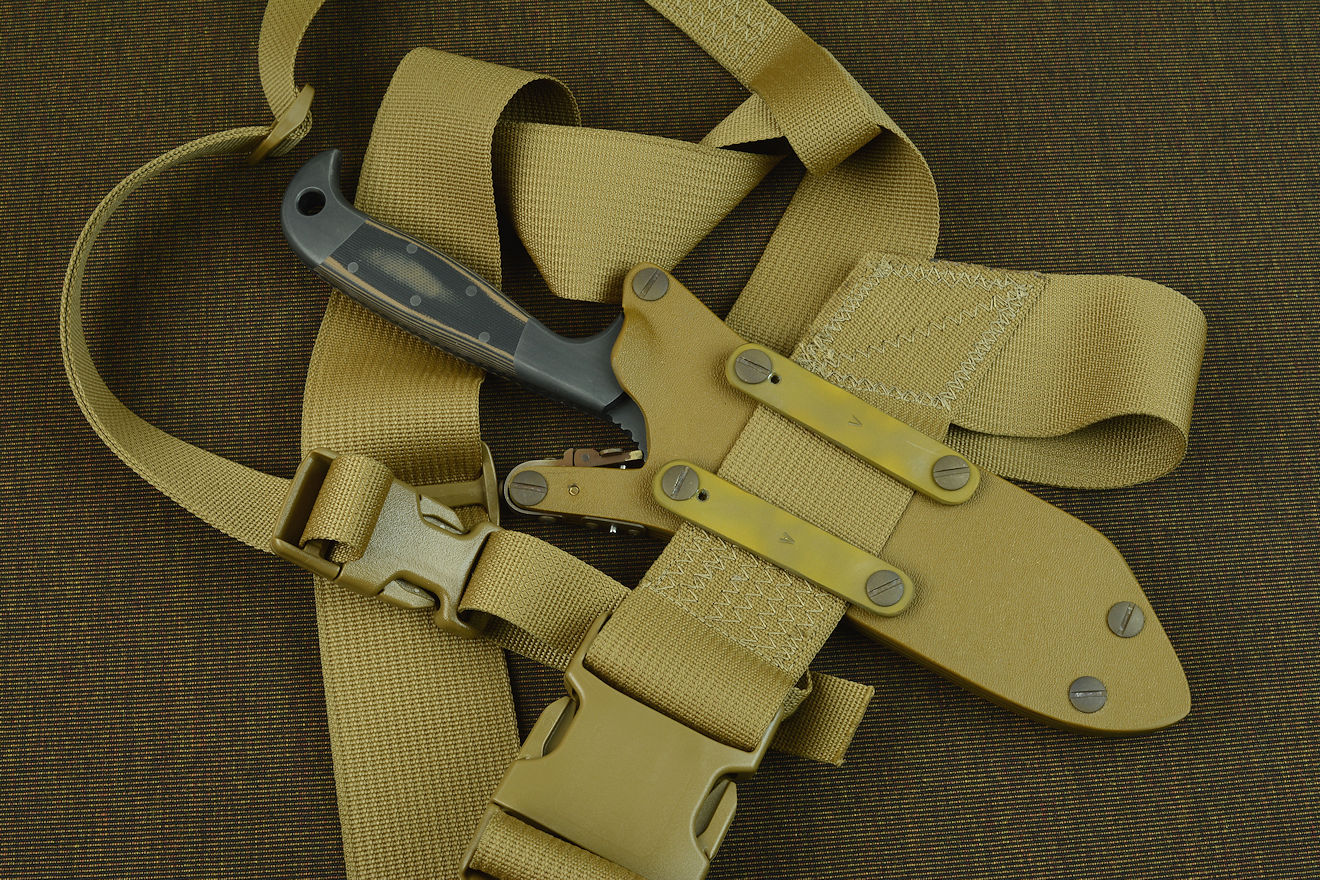
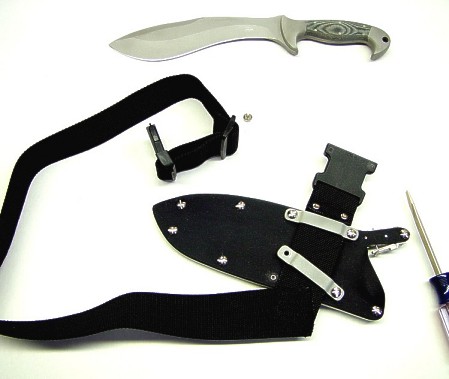
The tactical sheath harness is attached by first removing the male component of the Chicago screws that hold the aluminum die formed belt loops to the knife sheath. The harness is made of 2" wide polypropylene webbing, .100" thick. The webbing just fits under the belt loops, and is tightly held in place when they are screwed to the sheath. The harness is laid across the back of the sheath as shown. The area where the sheath mounts to the harness webbing is custom made just wide enough for the sheath, and the sheath will not slide around because there is no play to allow it. The angle change of the flat web has six full runs of triple zigzag stitching in upholstery nylon, so is permanent.
Here you can see how the harness is attached. The fit is tight and secure. The buckle is ABS plastic, the buckle rivets are nickel plated steel. This is a highly water-resistant rig.
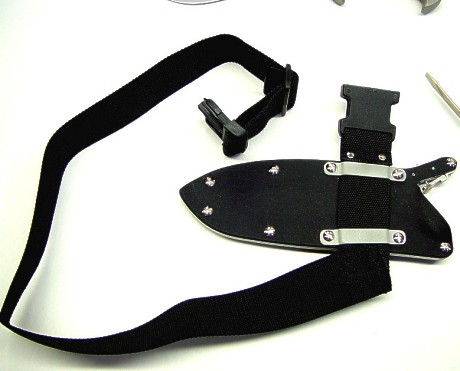
The harness is secure. In this photo, you can see that the sheath can not slip around on the webbing, even if it had play (which it doesn't) I made this to be as solid and tight as possible. This orientation allows the sheath to be worn handle down, upside down, across the chest and an adjustable height.
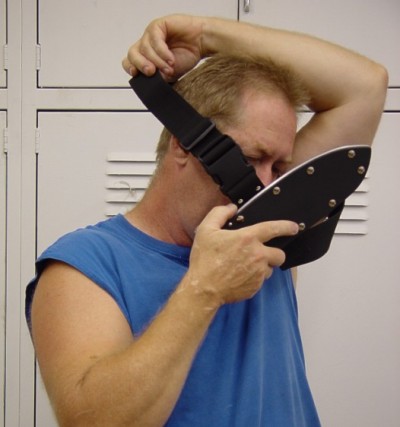
Here, your favorite knife maker shows the quickest way to don the harness. Simply put your arm through, and slip over the head. For information, this rig can be made reversible for left handed wearers, as can be the sheath, as the aluminum sheath loops can be screwed to either side of the sheath. Remember, this accessory is only for a positively locking sheath.
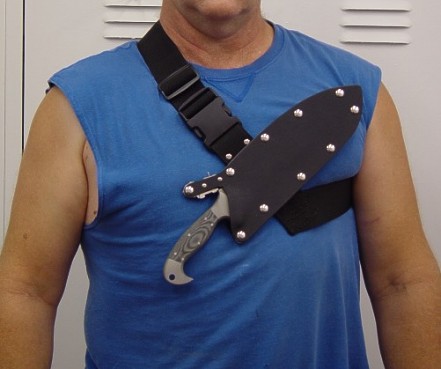
Here's how it rides: simple, clean, and snug. the angle of the webbing wraps comfortable under the armpit, and up over the back without wrinkling, folding, or bunching. The harness sash is length-adjustable above the buckle. If clients request it, an additional security strap could be attached that girths the chest. Currently, this is a very stable platform and puts the knife very conveniently at the ready.
In my newer locking sheaths, an additional position is possible. The belt loops can also be situated at the Chicago screws that are closer to the sheath tail, which would lower the position of the sheath in the harness, putting the knife handle closer to the waist.
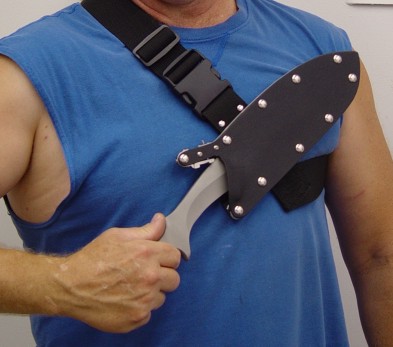
The knife can be easily unlocked with the thumb and the blade pulled in a very natural downward and outward motion. Reinsertion into the sheath is equally easy, but with all re-sheathing, care and attention must be paid to the location and alignment of the point and cutting edge of the knife blade.
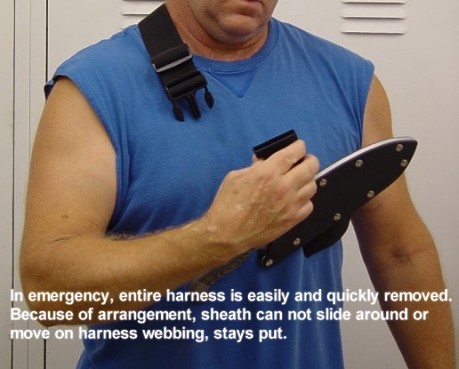
In an emergency, the harness can be quickly removed by squeezing the tab locks on the large ABS plastic buckle.
The hardware can also be made in mil-spec metals if desired.
There are some additional accessories and add-ons that I have included to expand the usefulness, reliability, and function of these critical sheath accessories. This is all part of my commitment to service in this tradecraft, industry and art, and I'm sure I'll add more as time and interest dictates. It is my goal to make the best knife possible for my client's individual needs and uses.
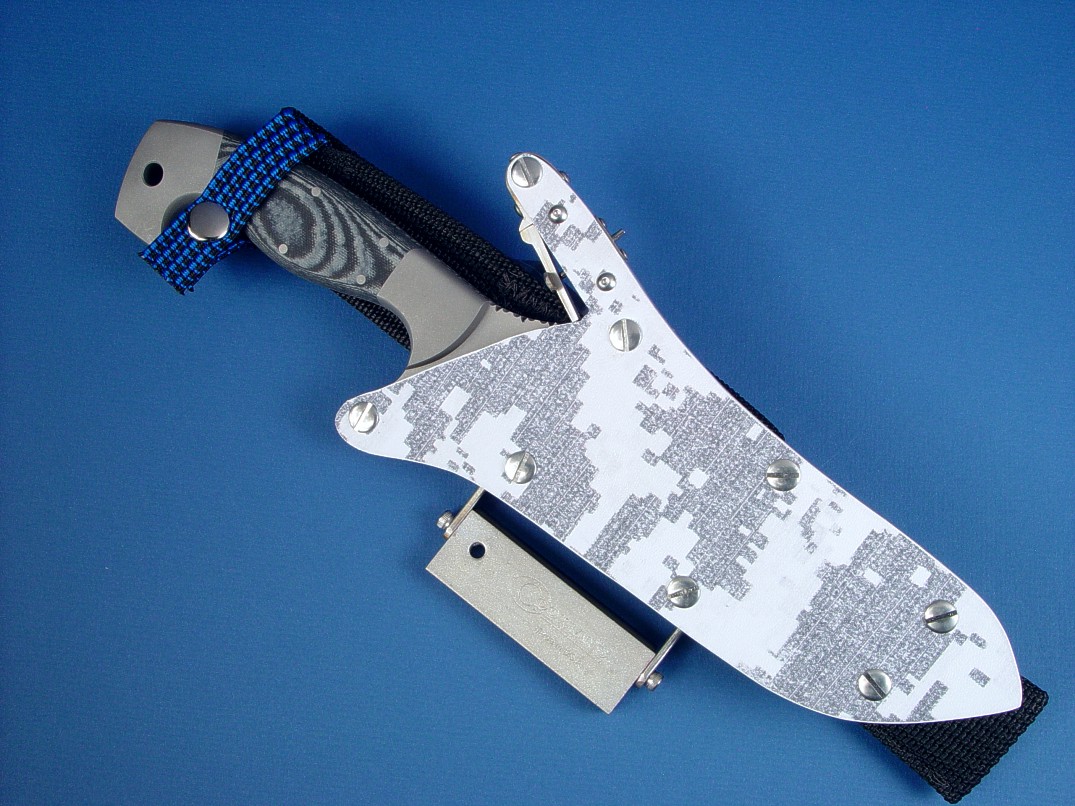
In the annotated photograph below, you can see the Firesteel/Magnesium block fire starter that is part of my ultimate locking knife sheath belt loop extender. This critical item is used to start fires in wilderness and survival situations. I researched plenty of components, methods, and systems for fire starting, taking many facts into account, as well as interviewing clients in the survival, tactical, and combat field about these systems. Here is some of the information that is important to understand when relating to the science of survival and fire starting.
When you examine these bulleted points, it's pretty clear. The ultimate fire starter would be one with unlimited igniting potential, one that could produce a spark and ignition no matter how wet the environment is. If dry tinder can be found, the lighting system should be reliable enough to ignite it. Currently, the simplest and most reliable combination is the Firesteel/Magnesium block.
The block works very simply with the knife. The cutting edge of the knife is used to shave or scrape off slivers and bits of magnesium metal. Magnesium is highly flammable in thin shavings and burns white-hot. In a block form, it is safe and benign. Because this metal is soft, it doesn't take long to work up a small pile of shavings. On top of this pile, tinder is laid. The block has mounted in one side a three-inch long striker of extremely high carbon steel commonly called a flint. This is not really flint, flint is a stone that is formed by prehistoric ocean goo that has been petrified and replaced by quartz (that's the lapidary in me writing). Due to the alloy content of this special "Firesteel" a simple stroke along it with a hard piece of metal produces a tiny shower of sparks. The block with fire steel is placed closely to the shaving pile, and the magnesium is ignited, igniting the tinder, which can be teased into a fire.
These devices are extremely simple; there are no moving parts, no mechanisms, and they withstand total immersion and extreme environments. They are fairly common and well known, manufactured by many companies, and work beautifully with one simple tool that everyone should have, their knife.
There are some concerns that I try to address in my application of these fire starters to the accessory package.
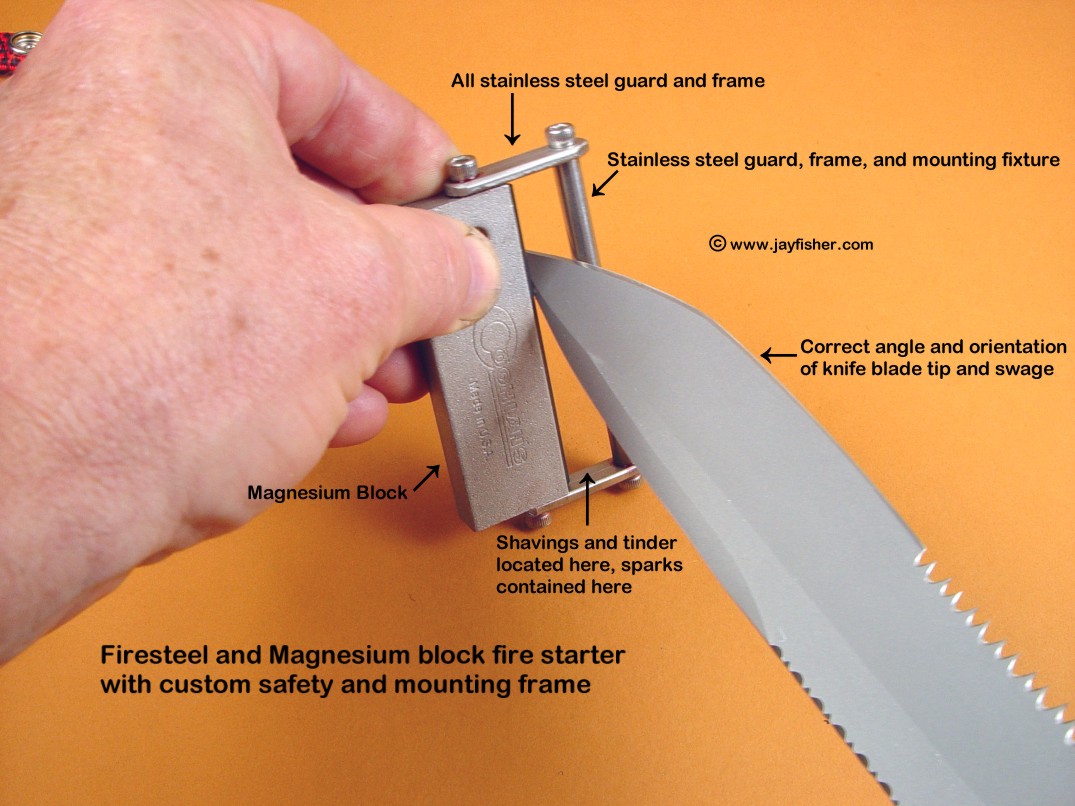
To answer these concerns, I designed a simple yet effective hardware adapter for these blocks. It consists of all 304 stainless steel (18-8 high nickel, high chromium austenitic stainless steel) components for absolute corrosion resistance, that are machined and bolted to the magnesium block and fixed in position. Though the round turned and threaded rod will allow the device to move on the sheath belt loop extender, the cage always protects the flint (striker or fire steel) from being hit by nearly every object the wearer may contact. The cage formed by the fitting guides the knife blade as it scrapes the striker, and because the frame is solid and the strike consistent, the sparks are concentrated at the stainless steel lower bracket. So the user knows just where his magnesium and tinder pile should be located. Another helpful advantage is that the blade tip only can slip between the guide rod and the fire steel, so greater control and safety is possible. In fact, the swage is the part that works best in this guided cage arrangement, which protects the blade cutting edge, and the guy who is using it. Pretty neat!
Please examine the annotated photograph below to understand how this works.
The use of this type of fire starter assumes that the survivalist who carries it will be able to find his own tinder, and I don't recommend carrying tinder packs, oiled or waxed cotton, lint wads, or any other troublesome and messy adjuncts to starting a fire. If you can't fine or create tinder in the field, you probably won't have the fuel to build any fire or keep it going!
The most important device for survival is your brain.
No device is failsafe, particularly if your brain is suffering from
hypothermia.
Knowing how to start a fire is critical.
Having something to start a fire is necessary.
Knowing when to start a fire could mean your life or your death.
When I researched the many issues that might be pertinent to the survivalist, combatant, soldier, professional, or serious knife user, there was one that kept popping up. Every knife eventually dulls. Though in times past anyone with moderate skill might be able to pull of an edge dressing on a convenient rock with a piece of carbon steel, new knives, thin geometries, and high alloy content blades would mean that although a blade could hold an edge much longer than the knives of the past, sharpening could be a daunting experience, and out of the realm of possibility of the knife user, particularly in the field.
Thankfully, we have an answer to the toughest, hardest, and most wear resistant blade sharpening problems. It is the diamond. Nothing is as hard as diamond, and diamond abrasives can be plated along with nickel to a high nickel content substrate forming nickel-bedded diamond abrasives. I use this type of abrasive in my shop to grind and polish gemstone, metals, and yes, even to sharpen knife blades. A leading company provides a neat, compact and effective small pad of diamond abrasives fused to a tough plastic folding body that can be carried without even noticing it's there. Diamond Machining Technology in Marlborough, MA makes many types of diamond abrasive products, including the Mini-Sharp right here in the United States of America. They make several grades of abrasives, and I've included these handy sharpeners in a custom sewn pocket on the back of the ultimate sheath belt loop extender made just for the Mini-sharp. Don't let the small size of this device fool you. It can sharpen the hardest and most wear resistant tool steel blades there are, including CPMS90V, D2, and solid carbide. These products (with the application of a drop of water or spit) will cut, and cut, and cut.
With these sharpeners I include DMT's instructions. They follow the circular motion technique of sharpening, keeping the angle at about 20 degrees. This will hone up your knife in the field. By the way, the sewn pocket at the back of the extender is just the right length and size to hold the Mini-Sharp tightly. You remove it with a thumbnail. And it can't come out unless the sheath is removed from your body and the industrial strength Velcro straps are opened. So you can be sure your diamonds are always where they need to be, at the ready.
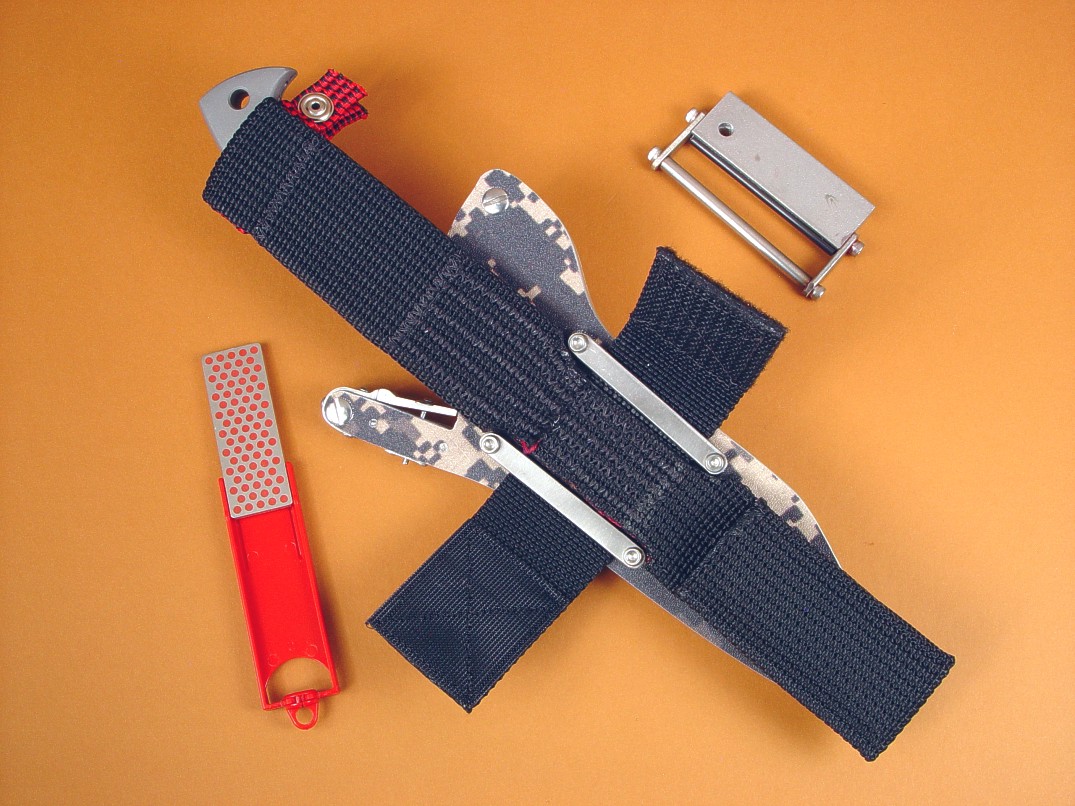
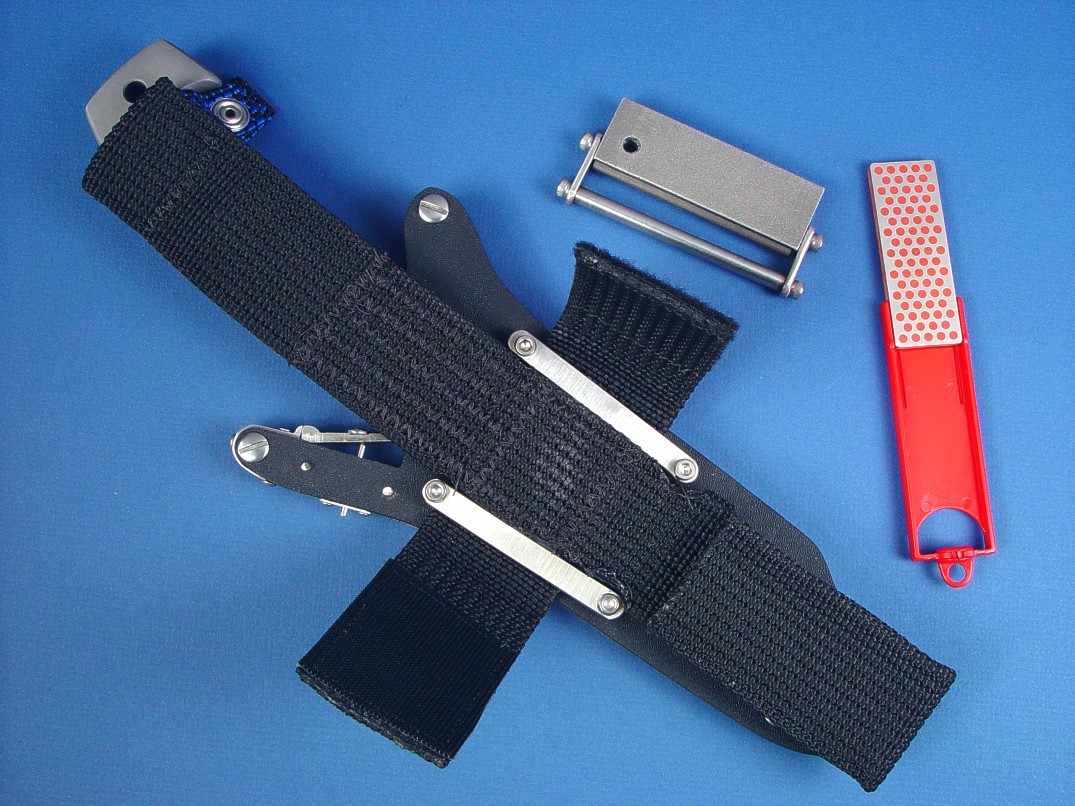
In about mid-2011, with input from some of my military and tactical knife clients, I added a small flashlight to the Ultimate Tactical Knife Sheath Belt Loop Extender. I did some detailed research and weighed all the options. I opted for a specially fitted Maglite® Solitaire®. These are the reasons for this choice:
Both my tension fit kydex, aluminum, and steel tactical sheaths and my locking kydex, aluminum, and stainless steel sheaths have always had reversible belt loops. These loops are made of die-formed 5052H32 high strength, corrosion resistant aluminum, and most of them are bead blasted and sealed with acrylic for zero care. These tough loops are also sometimes requested as clamping straps to tightly grip the belt, strap, or webbing that they will mount on. I've constructed them to be able to be mounted on either the typical front face of the sheath or the back, so the sheath can be worn on either side.
To increase the wear options, in about mid-2009, I started constructing them with variable placement. This means that in addition to mounting on either face of the sheath, the belt loops can be located in several positions along the sheath frame. This allows the sheath to be worn high, mid-line, or low on the belt or strap location. The amount and placement of these anchor points varies between knives and sheaths, as the sheath body dimensions vary. For instance, in many mid-sized tension fit sheaths, I can locate three loop positions, for a total of six wear options. Some of the shorter sheaths like the locking sheaths only allow two pairs of placement options. With the locking sheaths, this can be handy if the knife is to be worn in handle-down (upside down) position on tactical vests. The arrangement will allow the 1" PALS webbing on tactical gear to accommodate various sheath positions.
The only user necessity to move the belt loops are a flat-blade screwdriver and something to push the Chicago screws out of the welts. When you do relocate these belt loops, please be sure that the Chicago screws are good and tight!
Below is an illustration of various belt loop placements on my popular PJLT tactical and CSAR knife with a tension fit sheath.
| Main | Purchase | Tactical | Specific Types | Technical | More |
| Home Page | Where's My Knife, Jay? | Current Tactical Knives for Sale | The Awe of the Blade | Knife Patterns | My Photography |
| Website Overview | Current Knives for Sale | Tactical, Combat Knife Portal | Museum Pieces | Knife Pattern Alphabetic List | Photographic Services |
| My Mission | Current Tactical Knives for Sale | All Tactical, Combat Knives | Investment, Collector's Knives | Copyright and Knives | Photographic Images |
| The Finest Knives and You | Current Chef's Knives for Sale | Counterterrorism Knives | Daggers | Knife Anatomy | |
| Featured Knives: Page One | Pre-Order Knives in Progress | Professional, Military Commemoratives | Swords | Custom Knives | |
| Featured Knives: Page Two | USAF Pararescue Knives | Folding Knives | Modern Knifemaking Technology | My Writing | |
| Featured Knives: Page Three | My Knife Prices | USAF Pararescue "PJ- Light" | Chef's Knives | Factory vs. Handmade Knives | First Novel |
| Featured Knives: Older/Early | How To Order | 27th Air Force Special Operations | Food Safety, Kitchen, Chef's Knives | Six Distinctions of Fine Knives | Second Novel |
| Email Jay Fisher | Purchase Finished Knives | Khukris: Combat, Survival, Art | Hunting Knives | Knife Styles | Knife Book |
| Contact, Locate Jay Fisher | Order Custom Knives | Serrations | Working Knives | Jay's Internet Stats | |
| FAQs | Knife Sales Policy | Grip Styles, Hand Sizing | Khukris | The 3000th Term | Videos |
| Current, Recent Works, Events | Bank Transfers | Concealed Carry and Knives | Skeletonized Knives | Best Knife Information and Learning About Knives | |
| Client's News and Info | Custom Knife Design Fee | Military Knife Care | Serrations | Cities of the Knife | Links |
| Who Is Jay Fisher? | Delivery Times | The Best Combat Locking Sheath | Knife Sheaths | Knife Maker's Marks | |
| Testimonials, Letters and Emails | My Shipping Method | Knife Stands and Cases | How to Care for Custom Knives | Site Table of Contents | |
| Top 22 Reasons to Buy | Business of Knifemaking | Tactical Knife Sheath Accessories | Handles, Bolsters, Guards | Knife Making Instruction | |
| My Knifemaking History | Professional Knife Consultant | Loops, Plates, Straps | Knife Handles: Gemstone | Larger Monitors and Knife Photos | |
| What I Do And Don't Do | Belt Loop Extenders-UBLX, EXBLX | Gemstone Alphabetic List | New Materials | ||
| CD ROM Archive | Independent Lamp Accessory-LIMA | Knife Handles: Woods | Knife Shop/Studio, Page 1 | ||
| Publications, Publicity | Universal Main Lamp Holder-HULA | Knife Handles: Horn, Bone, Ivory | Knife Shop/Studio, Page 2 | ||
| My Curriculum Vitae | Sternum Harness | Knife Handles: Manmade Materials | |||
| Funny Letters and Emails, Pg. 1 | Blades and Steels | Sharpeners, Lanyards | Knife Embellishment | ||
| Funny Letters and Emails, Pg. 2 | Blades | Bags, Cases, Duffles, Gear | |||
| Funny Letters and Emails, Pg. 3 | Knife Blade Testing | Modular Sheath Systems | |||
| Funny Letters and Emails, Pg. 4 | 440C: A Love/Hate Affair | PSD Principle Security Detail Sheaths | |||
| Funny Letters and Emails, Pg. 5 | ATS-34: Chrome/Moly Tough | ||||
| Funny Letters and Emails, Pg. 6 | D2: Wear Resistance King | ||||
| Funny Letters and Emails, Pg. 7 | O1: Oil Hardened Blued Beauty | ||||
| The Curious Case of the "Sandia" |
Elasticity, Stiffness, Stress, and Strain in Knife Blades |
||||
| The Sword, the Veil, the Legend |
Heat Treating and Cryogenic Processing of Knife Blade Steels |